Brooding On

DIY Composting Toilet

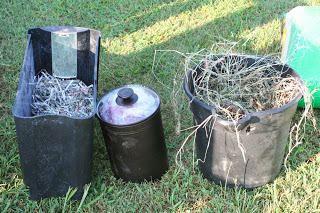
So, either you're convinced or curious.  Either way, welcome back to our discussion of our new composting toilet.  (If you're lost, you need to read yesterday's entry about why I built one and why you should, too). 
Most of what you need to build your own, you may already have lying around. 

So, go gather up these items:

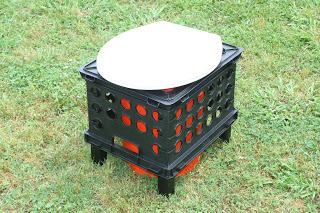
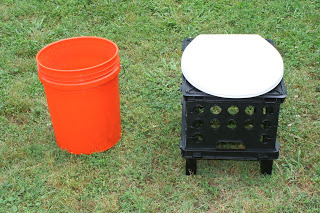
milk or filing crate
5-gallon bucket
scrap wood for the legs
toilet seat
zip ties

Tools I used:

pocket knife
jigsaw
chop saw
scissors
drill

I did have to buy the toilet seat (the cheapest plastic version I could find was $9 and change); everything else we had on hand.

1.  Place your 5-gallon bucket under your crate, and using the pocket knife, score the crate just outside where the bucket is to mark where you'll cut with the saw.  You want the bucket to just fit through the hole you'll create.
2.  Remove bucket and use jigsaw to cut along the line you made, creating a circular opening for the bucket.
3. Using the chop saw, cut the 4 legs to a length that just allows the bucket to peek above about a 1/2 inch.  I think I cut my legs 14.5" long.  (I spray-painted mine black to match the crate with paint I already had; while this does make for a nicer looking backyard 5-gallon-bucket pot, it's not a necessary step.  :)

4.  Attach the legs by threading zipties through the crate and tightening them around the legs.  Use scissors to snip off excess.  My zip ties happened to be black (how fortuitous!), so they are difficult to see, even in a photo.  Sorry.

5.  Attach your toilet seat.  My crate didn't have holes where I needed them, so I had to drill some.

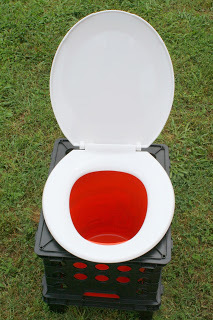
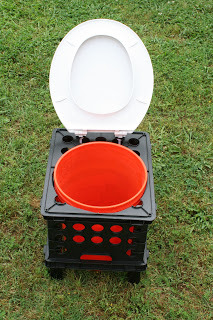
6.  Set your finished toilet over the bucket and you're ready to go! 

I think we may add a toilet paper holder to the side, but I'll have to check the store for my options on that.  Since this crate lived a previous life in my high school English classoom, I removed a label from the front that read "Makeup Work."  I suggested we replace it with another one that says "Making Doo."  That idea was immediately shot down by very literal Girl 1 who was quick to point out that it doesn't work because we'll only use ours for #1.  Oh, well.

By the way, Little Boy is definitely the biggest fan of the potty thus far.  In fact, my plan to cut down on the flies let into the house when he runs in for a quick potty break is totally backfiring on me.  He's actually making extra trips outside just so that he can use the new toilet!  What is it with boys and al fresco urination?

I didn't take pictures during the process, so my explanations may be difficult to follow.  Please message me or comment with any questions.

Why I Built a Composting Toilet and Why You Should Too

I know that lots of you already think we're crazy around here.  For those of you who haven't yet made that judgment, let me just get this over with and move you over into the "Yep-They're-Crazy Camp" -- I built a composting toilet.  And we intend to use it.  Probably in the backyard.  Much like an outhouse.

Since I feel I may need to reel you in on this idea, let's devote today's post to WHY one should build a composting toilet and allow tomorrow's post to explain HOW to actually do it. 


Why Build a Composting Toilet:

(Okay.  I'm not going to get into the whole Humanure debate here.  We intend to use our toilet to catch urine only.  So, my arguments assume a #1-only potty.  If you're unfamiliar with the humanure debate and are bored, just Google it, and you'll have hours of entertaining reading.)

1.  You get to use power tools!  Don't let that scare you off, this thing came together in the span of about 15 hands-on minutes.  And, I guess, the fact that you get to use power tools is maybe not the most important reason to make a composting toilet, but it is the most exciting part of the process.

2.  Human urine is nitrogen rich.  If you grow a garden (or just pretty ornamentals), your soil needs regular fertilizer to keep plants productive and healthy.  Developing a compost pile is a must for the serious gardener.  But, studies show that the urine/compost combination is even that much more powerful.  So, why not just go pee on the plants?  Straight urine is too potent for plants and needs to be watered down.  Our plan is to empty our potty onto our active compost pile.  This will speed decomp and add nitrogen to our pile.  Rain will serve to dilute the urine as the pile develops over time.  Now, even if you do not have a compost pile, you can still use urine in your garden or flowerbeds.  Experts disagree on the urine-to-water ratio that is appropriate (suggestions I've read range from 1:3 to 1:10), but all advise that you apply your urine/water combo a few days ahead of a planned harvest.

3.  Who couldn't use an extra toilet?  We're thinking our toilet will live somewhere outside.  Especially this time of year, we spend large chunks of our day outdoors, so this could cut down on, say, the number of flies let into the house by Little Boy when he runs in for a quick pee before returing to his dirt pile outside.  Girl 1 refuses to use the new pot unless I enclose it in some way like a port-a-potty, though I was just thinking we'd hunt down a good, private spot that's not viewable from outside the yard.  We'll see. (For the record, Little Boy is pretty excited about the new potty and wanted to be very involved in in it's construction.  Girl 2 just shrugged her shoulders when I asked her how she felt about it, but she is thankful I've chosen not to include the photo I took of her trying it out.)

4.  Pee is free and abundant.  I guess you could go buy bags of nitrogen-rich fertilizer for your garden, but, if you have to stop for a pee while at the big-box store making your purchase, don't miss the irony.  Why not make use of what we already have?

5.  Our toilets use approximately 6 gallons of water per flush.  In our family of five, our flushing adds up to a lot of natural resources consumed in water usage, sewage treatment, etc. Generally speaking, less flushing is better. 
This may seem gross, but a lot of times (especially at night) we subscribe to the "if it's yellow, let it mellow; if it's brown, flush it down" philosophy.  This cuts down on flushing, but you can only let so much paper accumulate before a flush is necessary. 
Using the composting toilet regularly could greatly cut down on our environmental impact.  I mean, why would we want to expend valuable resources to dispose of something that, if harnessed, could actually be beneficial in growing our fruits and vegetables?


Instead of wondering why I should build a composting toilet, all of these reasons make me wonder why I haven't built one until now!

I realize, though, that this isn't for everyone.  And some of you may be thinking, "Remind me never again to accept the surplus vegetables Ashley offers me at church!"  :)  But, if you're at least a little intrigued, check back tomorrow to see how to build your own out of items you may already have lying around.

New Uses for Old Things

You may remember these from my post on convenience foods.  One of the ways I've justified to myself the purchase of these yummy grapefruit segments was my plan to reuse the containers.
So,  once I'd amassed a good number of them, I set about removing the labels and filling them up with pantry staples.  These containers are great for such uses because . . .
1.  They are wide-mouthed and therefore easy to scoop out of.
2.  They are shaped in such a way that they are easily gripped.
3.  They stack well and are the perfect height to stack two-high on my pantry shelves. 


I usually make use of Goo Gone to get off the sticky stuff leftover from labels.  This time, I used peanut butter and had great results.  I felt a little weird using our organic, unsalted peanut butter that comes from our co-op, though.  Maybe I should pick up a tub of the cheap stuff to use for label removal in the future.  :)

Cost of Outfitting the Kids for Spring= $0

Outfitting 3 growing kids without breaking the bank is no small task.  When I look at it as an organizational challenge, it becomes a lot of fun for me (I know, I'm an organizational nerd). 
The whole process starts with three pages like this, one for each kiddo.  It's basically a list of all the clothes I think they need to make a full wardrobe.  I inventory their current closets and drawers full of out-of-season clothes and make notes of the holes that need to be filled.  Also, while going through those out-of-season items, I pull out anything outgrown that I'd previously missed and add it to the kids' sale stockpile.

Though there are tons of these consignment sales around now, I use the Popsicles Kids Sale in Jonesboro to both sell the kids' outgrown things and fill in the gaps in their closets.  I hang, price, and tag all my items for sell and haul them to the sale.  By being a consignor, I get the privilege of early shopping;  for the most recent sale, this was last Wednesday.


It's hard not to get carried away when shopping because there's so much cute stuff.  But, I keep my inventory sheets on hand and refer to them as needed during shopping.  As pictured here, I always surprise the kids with a treat from the sale.  I'm usually able to get them each a pretty cool toy for less than $5. 

This year, I spent $133 (including the toys) on the items I purchased.  And, I earned $151.80 on the items I sold.  I do have to drive a ways to participate in this sale, so I have to consider the price of gas, but the enjoyment I get in having a shopping night all alone is worth that price, easy!

For more on Kid Sale Consignment, check this out.  If you're interested in getting involved in one of these sales, check out the Popsicles website or like them on FaceBook to get info about their twice-yearly sales.

Make Your Own Lotion!!

Remember this beautiful candle jar from yesterday's post? 
You could use it any number of ways. 

I decided to fill mine with some of my homemade, all-natural lotion (I've been going through it like crazy this winter!).

Believe it or not, this is really a very simple process. 


Here's what you need:

1/2 c. olive oil (not extra virgin)
2 Tbs. beeswax
(I use the little pearls because they melt well.  They can be purchased any number of places.  I order mine from Brambleberry, which is where I get all my soap/lotion supplies.)
1 c. tepid water, filtered or bottled
10 drops or so of essential oil
(I used Rose this time, but it's up to you.  Choosing your own scent is the fun part!)

This recipe will make about 1.5 cups of lotion.  Test your jar to be sure it'll easily hold that volume.

Also, to make it the way I do, you'll need an immersion blender.

Ready?  Here we go!

Combine your olive oil and beeswax in a double-boiler.  I used a makeshift one, a measuring cup balanced in water-filled pan.


Stir over medium heat until beeswax melts.


Meanwhile, fill your jar with VERY hot tap water.  We have our water heater set so that it doesn't get very hot, so I heated about 2 c. of water in the microwave then poured it into my jar.  This is not the water that'll be apart of your lotion; you'll actually pour this water out before filling the jar with the lotion ingredients. 


If you're one of those people who needs an explanation for everything, we're using the hot water to warm the jar.  If the jar is cool, the beeswax will reharden too quickly once it gets poured in. 

Once your beeswax has melted, act quickly. 
Dump out the hot water.
Pour in the oil/beeswax combo.
Add your essential oil.


As you blend, slowly pour the tepid water into the oils.

And blend.  And blend.  And blend.  And when you think, "Surely Ashley didn't mean that I should blend this long!" you might be half-way there.

You'll know you're finished when you give it a stir and can't see anymore unincorporated water.

Give the rim of your jar a good wipe down so that it looks pretty.

Allow it cool completely before putting the lid on.  If, as it cools, you notice some water on the surface, just pour it off and make a note-to-self that you probably should have blended longer.

Yum!!  This really is the most amazing moisturizer!

Now, some other good things to know.

1.  You do not have to make it in the storage container.  Another option is to make it in your blender then "pour" it into storage containers.  But, be warned:  the mixture is so thick that you'll have to do a lot of scraping down the sides as you work.  And, it may not pour well.  Also, the oil and wax combo is not easily cleaned up.  Making it in the container saves a lot of cleanup. 
That said, rubbing the oiled containers down with straight dishsoap before using water to wash them out seems to work pretty well to get tools clean.  Also, baking soda works to absorb the grease.

2.  This is an all-natural product made without artificial preservatives.  It should be stored at room temperature.  It should last a few months without going bad, but if you don't think you can possible use this much lotion in that amount of time, put some into another cute container and give it away to a lucky friend.  Signs that it may be past its prime include texture or color change.

3.  Making It, the amazing book this recipe comes from, suggests that this makes a good make-up remover/cold cream.  I personally have very touchy/oily skin, so the idea of slathering on an olive oil lotion makes me cringe, but if you have dry skin, this could be a good option for you.  I know that my sister has also used this lotion on the dry ends of her hair.

The first time you make this, it may take you awhile as you navigate the directions.  But, once you've made it a few times, you can turn out a batch in less than 15 minutes.

Please let me know if you decide to give this a try!

Reusing that Beautiful Candle Jar

I don't very often shell out the cash for nice candles, but this Christmas I wanted one that would put me in the Christmas spirit.  I picked one out from Bath and Body Works that came in this beautiful jar with a silver lid -- you know the kind I'm talking about.  And, enjoy it, I did!  I had it right there on the coffee table all season and lit it nearly everyday.  Once the wax was so low that the wicks would no longer burn, I put it on a candle warmer until the wax no longer had any scent remaining at all.

Still, not ready to be done with the beautiful jar, I threw it into the freezer for an hour or so.  This hardens and shrinks up the wax so that it pretty much falls out of the jar.
I used a dull knife to pry the wax loose.  It came out all in one big chunk.


I washed the jar with soap and water and used some trusty Goo Gone to remove the sticker residue from the bottom.

I gave it a good wipe down with vinegar to remove any last traces of wax.

Now, I've got a super-cute container that could be used in any number of ways.  Pictured above is one possibility.  But, I've got bigger plans for mine.

For that, you'll have to check back tomorrow!  ;)

Free Gift Wrap!

What could be better than free wrapping paper for the holidays?  How about gift wrap that allows you to reuse something you would otherwise throw away?  Or how about gift wrap that can be recycled once gifts have all been unwrapped?

Sounds good, huh?
Last year, we wrapped in newspaper, which was fun.  This year, I decided to use the packing paper that fills every package we get from Amazon (and because we live where it's hard to do much local Christmas shopping, we get A LOT of Amazon boxes around the holidays.)  The ribbons are salvaged from gifts we've received in years past, and the gift tags are made out of Christmas cards we received last year, cut out with fun scrapbooking scissors. 


They really pack so much of that paper into these boxes!  The boxes themselves make a great kill mulch outside.  If you have an area that you'd like to plant in the spring and need to kill the grass, lay down a bunch of cardboard now, hose it down, and you'll be ready to go come spring.

Oh, and since it's apparently the thing to do to post a pic of your tree online, here's ours.  John says it looks like it has hair!  ;)  This is "Momma's tree."  I decorate it, evenly spacing the ornaments that are all of one color family.  I LOVE my tree.  If I were choosing decorations again, I probably wouldn't go with these, but I'm not about to spend $ on new tree decorations.  It's the lights I enjoy most anyway.  I like to sit in its glow in the early morning with a cup of coffee.  Quiet Christmas tree moments are the best!

Upstairs, we have the kids' tree.  They decorate it entirely on their own, and it's full of the more colorful ornaments, including, of course, all the awesome handmade ones they bring home from school each year.  Of course, there are no ornaments at the top because they can't reach that high!  But, I love that about it.  They want their ornaments to be where they can see them anyway!  So, the downstairs tree may be classically beautful, but it's the upstairs tree that tells the stories.

Curbside Compost


Composting is really catching on.  In fact, though it's hard to imagine here in a town where I still have to haul my own recycling items to the plant myself, many big cities are moving to a three-bin trash pick-up system:  trash, recycling, and compost.  This allows those who don't have the space to compost for themselves a way to reduce landfill trash and help the environment by turning yesterday's orange peel into tomorrow's fertilizer for the local park.

While great for apartment dwellers who may not have a way to benefit from their own compost pile, compost pick-up is not really necessary for most of us.  With the commitment of a little space and time, most house dwellers can make use of rich compost in their own lawns and gardens.

If you've got the space to set up a simple system, get started! 

Of course, anything that grows is fit for the compost, but here's a list of some things you may not have thought of that can also go on the pile:

1. Coffee grounds and filters
2. Tea bags
3. Used paper napkins
4. Pizza boxes, ripped into smaller pieces
5. Paper bags, either ripped or balled up
6. The crumbs you sweep off of the counters and floors
7. Plain cooked pasta
8. Plain cooked rice
9.  Stale bread (of course, if you've got chickens, give items 7-9 to them -- they'll thank you!)
10. Old herbs and spices
11. Wine corks
12. Paper egg cartons
13. Toothpicks
14. Nail clippings
15. 100% Cotton cotton balls
16. Dryer lint
17. Pencil shavings
18. Contents of your vacuum cleaner bag or canister
19. Newspapers (shredded or torn into smaller pieces)
20. Leaves trimmed from houseplants
21. Dead houseplants and their soil
22. Flowers from floral arrangements
23. Used matches
24. Ashes from the fireplace, barbecue grill, or outdoor fire pit
25. Jack o' Lanterns  (it'll be that time before we know it!)

For a more complete list of things you may be surpised can go to the pile, check here.

The Man Who Quit Money by Mark Sundeen

From the Amazon book description:  In 2000, Daniel Suelo left his life savings-all thirty dollars of it-in a phone booth. He has lived without money-and with a newfound sense of freedom and security-ever since.
The Man Who Quit Money is an account of how one man learned to live, sanely and happily, without earning, receiving, or spending a single cent. Suelo doesn't pay taxes, or accept food stamps or welfare. He lives in caves in the Utah canyonlands, forages wild foods and gourmet discards. He no longer even carries an I.D. Yet he manages to amply fulfill not only the basic human needs-for shelter, food, and warmth-but, to an enviable degree, the universal desires for companionship, purpose, and spiritual engagement. In retracing the surprising path and guiding philosophy that led Suelo into this way of life, Sundeen raises provocative and riveting questions about the decisions we all make, by default or by design, about how we live-and how we might live better.

To say that I enjoyed this book would be an understatement.  I'd recommend it to anyone.  I will warn you, though, that it will challenge you.  So, if you're quite complacent with the way you view the world and its workings, you may just want to avoid this one.  So, if you don't run out and buy it, at least humor me and check out the excepts below.  These are from the final portion of the book wherein Sundeen ponders what it is we Americans have to learn from folks like Suelo.

The author is writing about his own journey and recalling when he began reusing baggies and carrying reusable bags with him to the grocery store . . .

But here was the problem:  although these actions made sense, they didn't make me feel any less anxious, or more free.  How many times have I stood at the kitchen sink paralyzed by a plastic baggie?  If it were clean, having held, say, a sandwich, I'd simply rinse and resuse it.  But this one is smeared with mustard and rancid cheese and even a bit of mold.  My instinct is to throw it away.  But as we have learned, there is not such place as "away."  This plastic bag, if it doesn't end up clogging the intestines of some albatross or dolphin, will swirl at sea for decades, and even after it breaks down into tiny pieces, it will never fully decompose:  its toxic petrochemicals will haunt us forever.

But then I think:  That's ridiculous.  It's just one baggie.  And the washing of it will not only be a singularly unpleasant use of my time, but won't I be using precious water to wash it?  And burning natural gas to heat that water.  Not to mention the resource depletion and damage represented by the soap.  And by now I've already wasted five rminutes thinking about this, time that could have been better spent picking up plastic bags along the river. 

So I chuck the thing in the trash, but the next day at breakfast it's still there, peering up at me accusingly.  And the gears of my mind spin. Eventually, one day in the future, I'm going to need a plastic sandwich baggie.  And when I do, I'm going to buy a box of them, thus giviny my hard-earned money to the Ziploc corporation, or whoever, who doubtlessly engages in all sorts of toxic practices to manufacture these things -- I imagine a factory spewing brown sludge into a river, somewhere in the Rust Belt, or maybe China.  And I'll also be enabling my box of baggies to be hauled across the nation on gas-guzzling trucks that grind up the taxpayer-funded highways, which carve through the habitat of grizzles and moose and antelope, driving them toward extinction, and so on. 

Finally, I had to ask a therapist about this, and he said, "Why don't you try going outside and growing something?"

I guess I love this excerpt so much because I've experienced this "baggie moment" myself.  In fact, in moments like this, I almost envy those who've never given a second-thought to the environment or the impact their choices make on it.  But, what I love here is how the therapist redirects that "guilt" and asks him to do something about it.  Because it's true, when I carry my reusable bags to the grocery store and see the bazillion plastic bags being loaded full of groceries in every other checkout lane, I wonder how much of a difference I can really be making.  But, when I plant my garden, I know I'm doing something positive.  And, it directly impacts me and my entirely family.

And for all of you who are engaging in the struggle:

This whole project of changing the world is hard work.  And as much as we seek a balance, straddling the line between individualism and community isn't a recipe for freedom.  It's the opposite.  When you try to balance the anxiety of maintaining wealth (savings, mortgages, insurance) with the anxiety of being an ethical person (eating local food, lunching with hobos, reusing baggies, withholding taxes), you don't free yourself from either.  You end up with twice the anxiety. It's sort of like going on a diet.  Unless you're willing to go all in -- run six miles a day and eat only fish and broccoli -- you'll never have those sculpted abs you see in magazines.  But neither will you have the unabashed joy of scarfing double-frosted chocolate cake.  Instead you nibble away at half a piece, your enjoyment negated by your guilt that you couldn't refuse it altogether.

Compost Bin System is Complete

Lovely, isn't it? 

It's definitely not the most high-tech compost bin, but it gets the job done and cost us nothing.  We acquired the pallets a couple at a time.  In fact, the system began with three pallets, encompassing just one pile.  Last night, John affixed the last two pallets to make it a 3-bin system made up of 7 pallets all screwed together.  We figure this is all we'll need to keep us in year-round compost. 

The far-left bin is the newest.  All it has in it right now are the clippings from the squash plant that I cut away this morning.  This will now be the bin we fill with dryer lint, vegetable scraps, chicken poo, garden trimmings, etc. 

The middle bin has just been sitting for 4 months or so.  It is ready-to-use compost.  When we need to add some to the garden, we just scoop it out of this middle bin.

The far-right bin is the one we had been filling up (until yesterday).  Now, it will be allowed to sit and decompose for the next 4 months or so.  We will turn it periodically and be sure that it stays moist to speed decomposition. 

So, now that we have all three bins in place, the functions just rotate.  In 4 months, the far-left will be full and will become the one that is in the process of decomp, the middle will be empty and ready to be filled up, and the far-right will be decomposed and ready for use.

Never Buy Yogurt Again!

This post has been a long time coming.  I tried 7 batches of yogurt before I was finally ready to post about it.  I'll be honest.  When I first read how easy it is to make yogurt at home, I was a little embarrassed that I've been buying it from the store all this time. 

All the info I've read about yogurt making touts how easy it is to do.  I apparently was blocking out the part where they say "unless you're using goat milk," which of course I am.  Apparently the different construction of the fat molecules in goat milk makes getting it to set up as yogurt much more challenging.  I've yet to succeed with goat milk.  I did eat a jar earlier this week, but it was so runny that I had to pour it over my granola.  Apparently, in Europe, they prefer a runny yogurt.  It's considered more gourmet.  Since I've grown up with my Dannon from a plastic cup, I prefer to be able to spoon my yogurt into the bowl, so I refuse to count this thickened milk as a success.

Still, I'm not giving up on making yogurt from our goat milk.  In an effort to rule out other variables, I made a batch this week with cow milk from the grocery store and had great success.  So, since I'm assuming that most of you drink cow milk, I thought I'd pass along this little blip of success on my journey toward goat milk yogurt in hopes that you may be able to take it and run with it for your own families.

Here's how you do it: 

1.  Heat 1/2 gallon of whole milk (cannot by Ultra Pasteurized -- click here to see why -- read the label.  If it comes in a jug and just says "pasteurized," you're good to go) to 180 degrees.  Stir pretty much constantly once you get to 140 degrees so that you can be sure not to scorch the milk. 

Adding a thickener is optional.  I found that the cow milk came out thick enough without it, though.  If you try it the first time and found it too thin for your liking, add 1/4 c. powdered milk next time.  Add it to the milk BEFORE heating it.

2. Once your milk has reached 180 degrees, plunge it into a sink full of ice-cold water.  Watch it closely as the temperature will drop quickly.  When it reaches 120 degrees, remove from water and act quickly with the next step.

3. Add your starter culture.  You can go one of two routes here.  The easiest thing is to add 2 Tbs. of yogurt to the milk.  Be sure that the yogurt you choose is plain and contains active cultures.  It should say on the package. 
This one says it on the back near the nutrition information.  I love this Greek yogurt, so I tried this one (in several of my attempts). You will only ever have to buy one little tub, though, since you can just reserve 2 Tbs. from a previous batch to reuse next time.

Your other starter option is to buy a powdered culture from a supplier.  I've had success with Dairy Connection's ABY-2C culture, which is similar to a Bulgarian yogurt and I'd read is a good one to use with goat milk.  Cultures for Health, which is where I order my cheesemaking supplies also has several yogurt options, including a Greek that looks yummy.  It only takes a smidgen of this culture per batch (yes, smidgen is a technical term.  I just learned this myself.  Apparently a smidgen is 1/32 of a tsp.)


Whichever culture route you go, you stir it in immediately once your milk temperature has dropped to 120.


 Then, pour it into mason jars and cap tightly. 


Submerge in a small cooler full of nearly boiling water (I just had some water heating in a big pot on the stove alongside my milk so that it would be ready for the cooler.)

The goal is to keep your yogurt at an approximate temperature of 116 degrees for 6-8 hours as it sets up.  I found that in the kitchen, the cooler did the job pretty well.  About 4 hours in, I heated a bit more water and threw it in, just to keep things warm.  If it's a hot, sunny day, you could just sit the cooler outside.

Another option would be to use a Yogatherm or something similar.  I'd read about good results with goat milk, so I forked over the $40 for this electricity-free option.  It basically just super-insulates the milk to better maintain the temperature.  It's available at either Dairy Connection or Cultures for Health (see links above).

At the end of the 6-8 hours, open it up to be sure it's thickening.  Then, refrigerate overnight. 

In the morning, enjoy a bowlful with some fresh berries and honey.  Or, at least, that's what I'd do.  :)
1/2 gallon of yogurt is a lot.  Luckily, it should keep in the fridge for about 2 weeks.

  Don't forget to save those 2 Tbs. for your next batch, and you'll never have to buy yogurt again!


Happy Mother's Day to Me!

Among several other well-chosen gifts, this was one of the gifts I unwrapped on Sunday morning (my husband does such a good job!)  Has anyone ever been so excited about receiving a compost pail?  Apparently, John picked up on my not-so-subtle hint (click here for that post) that I'd love to have this pail.  He even got the exact model I'd linked to in the previous post.  I know, I know.  He's a keeper. 
Moving into it was almost as exciting as moving into a new handbag.  :)

For size comparison, here it is sitting next to our previous model.

So far, the charcoal filter in the lid is definitely doing its job, which is to keep odors in check.  Here, you can see it's got about a gallon-ful of orange pulp, coffee grounds, green onions, and more.  Still, you'd never know when the lid is on that it's holding all of that yuck!

I love that my husband knows me well enough to know that I'd rather receive a compost pail for Mother's Day than a vase-ful of flowers!

Getting Crafty

From building a pen, to painting the inside and outside of their shed, to carefully selecting, stacking, and filling their food bins, to taking the kids to the store to pick out their collars (and so much more) -- we've done a lot to prepare for our goats' arrival this weekend. 
But, with all of that done, there's nothing left to do but wait.

But, I don't do "idle" very well.  So, I decided that since their shed looks so nice now that it's been freshly painted, it deserves a little decor.  I found this sign online for $32 (click image to see it on Amazon) and decided to use it as my inspiration.  Honestly, I like my finished product even better! 
The challenge, of course, is to create a new sign that looks old.  To do this, I combined several techniques I read about on various other blogs and Pinterest.

1.  I started with this piece of plywood which used to be a part of our rabbit pen, but has since made its way to the trash pile because my amazing hubby has built Cocoa Puff a great new hutch (that's a future blog post).

2.  I knew I wanted to distress the wood, so I painted it a dark brown (leftover from our kitchen update a couple years ago) first so that that would peek through later on. 
3.  Then, I topped the dark brown with a red (leftover from our chicken tractor).

4. I chose a font and printed out the lettering.
5.  Once I had an idea of where the lettering would go, I used a yardstick to draw guidelines for where I would paint the white border.

6.  I painted the white border with paint leftover from painting the garden boxes. 
7.  Once it was dry, I laid out the letters and traced over the edges with a ball point pen, bearing down hard so as to create an indentation in the wood.

If you look closely, you should be able to see the indentation left behind by the ballpoint pen through the paper. 

8.  Paint the lettering.  I do not have a very steady hand, but the indentation in the wood creates a kind of well that keeps the paint from spilling over out of the lines.  This method really worked great! 

At this point, the sign is finished in its "new" form, but I wanted to beat it up a bit.

9.  This is definitely the most fun part.  Using sandpaper, I just went to town on it.  This allows the dark brown and even the wood beneath it to peek through.

See how the corner reveals the bright young wood underneath, giving it away as a new piece? 

10.  I used some wood stain (leftover from my recent rocking chair update) to age all the spots where the wood was showing through.  I applied it with a brush then wiped away excess with a rag.  See how the corner now has a darker, more weathered look?

A closer look at a heavily distressed part of the sign

The can on the left is the Bombay Mahogany Satin stain I used. 

11.  Then, using the polyurethane in the can on the right, I coated the entire finished product to protect my perfectly-weathered sign from actually getting weathered. ;)  I did actually have to buy the polyurethane.  As the only thing I had to buy to complete the project, I was able to do the whole sign project for $6.00.
Here's a look at the finished product.
And here it is hanging on the wall of the goat shed.

I hope the goats will appreciate their decor. ;)

Old Frame Gets a Makeover

This project all started with this old frame which came to me courtesy of my mom.  (Thanks, Mom!)  The goal was to create a crackled, antique effect for the frame and use it as a chalkboard to hang by the front door.

 First, I dissassembled the frame and painted the glass with chalkboard paint.

Next, I painted the frame with a dark brown paint.  This is the color that will show through the cracks of the top color when it's all done.


After I allowed that to dry for a few hours, I put a thick coat of Elmer's School Glue on the frame. 


I let the glue dry until it was tacky but not runny, then painted the top color, being careful to brush in only one direction (either left-to-right or right-to-left, but not back and forth)

For my top color, I chose an off-white (because I already had it).

When the glue under the topcoat dries, it pulls the topcoat apart and makes a crackle effect.  I'm just now realizing that you can't actually see it very well in this picture.  Sorry.  But, I am in the middle of a wreath project that will hang next to the chalkboard, so I promise, dear readers, to get a better photo of the frame when I post about the wreath.

Spring Color Pop!

Our house is decorated mostly in neutral colors.  This is especially true of our living room (now that it is painted cream rather than blue).  So, for spring, I thought I would inject a bit of color into our living room.  I decided to go with yellow because 1.) it epitomizes spring for me 2.) I love yellow! 3.) I can't wear yellow well.  It just doesn't look good on me.  But, it turns out, it does look good on my sofa!
All told, this little living room spruce-up cost me $6.61 (one can of spray paint and 3/4 yard of yellow burlap to recover the pillow).

I used the spray paint to yellow-fy two frames, one decorative bowl, and two lovely birdies.

Placed at random throughout the room, these little pops of color really bring spring to the living room!

Reusable Facial Cleansing Pads

In our home, we try to limit the trash we sit by the curb as much as possible.  Between recycling, reusing, composting, and feeding scraps to animals, we're able to cut our waste tremendously.  We then started taking a close look at what non-edible consumables we are buying (things like toilet paper, paper towels, kleenex, and napkins) and seeing what we could replace with reusable products.  One day, as I was washing my face and applying toner on one of those little round cotton pads, I realized that they were one of our last non-edible consumable hold-outs.  You may use cotton balls instead, but you know the kind of thing I'm talking about.  They may be sitting on your bathroom countertop in a cute little holder like this.

To end my use of the disposable cotton pads, I fashioned these little reusable pads that I can just toss into the wash.
They are about 1.5 x 3" which gives me plenty to hold onto when I'm using them and makes them substantial enough that I can find them when they come out of the dryer.  Each one is made of two different fabrics.  I used mostly flannel scraps that I had on hand and old baby washcloths that I had already moved to my rag basket.  I sewed the two layers together as if they were going to be little pillows, leaving enough area open to turn it right-side-out.  Once turned, I sewed around the outside edge to make them lay flat.  I've been using them for a couple months now, and they've held up great!  

I'd love to hear from you: 
What non-edible consumable are you still buying and would like an idea about how to replace it with something reusable?  Or what non-edible consumable have you quit buying?  What did you replace it with? 

Kids Sale Update

For those who read my blog about the Popsicles Kids Sale (and how great it is!), I thought I'd give an update on how it all turned out for us.  I was able to get most of the stuff missing from my kids' clothing inventory lists.  One big challenge is always finding the girls shorts and shirts that are okay for school (no more than 4 inches above the knee and straps at least 2 inches wide) as the sale is full of little tanktops and shortie shorts.  Overall, I did really well, though, and had a great time with my friend :) who was able to go with me.  I spent about $170 ($20 of which were on toys -- the kids have come to expect a surprise when they wake up the morning after a kids' sale-  it's like Christmas morning around here). 

After all my shopping, I was still missing a few pieces for the kids, so I got online and ordered the rest from Old Navy (who was having an online sale) and spent another $100.

The sale is now officially over, and I earned $336.25.  So . . .
  $336.25 Earned
-$170.00 spent at sale
-$100 spent at Old Navy= $66.25

Yep, I may have to fill in a few gaps in the months ahead as needs arise, but for now, I've basically wardrobed 3 kids for spring and summer and come out $66 ahead.  Not bad!

Waste Not, Want Not

Today, as I was taking a shower and using my little mesh drawstring bag I made to hold the little pieces of soap that would otherwise be rendered useless, I was reminded of something I read lately.  An author was saying that she knew times were tough for her family when her mom sewed pantyhose bags to be able to make use of every last soap shard.  When I read it, I remembered thinking, "But what else would you do with the tiny pieces of soap?  Throw them away?"  I assume that's what most of us do. 

Later in the day, I found myself mending a hole Girl 2 tore in a dress that she wore to school last week.  (Whether or not the hole was ripped intentionally because of how upset she was that she had to wear a dress to school remains unknown.  I prefer to think that my sweet child is not capable of such malicious behavior, so we'll go with that.)  Once I'd fixed the hole in the dress, I searched my button jar for a button to replace the one on John's dress slacks that was broken by the cleaners this week and sewed it on.  This season, I've ironed on countless knee patches (Oddly, Little Boy is the only kid who's not yet donning patched jeans -- I thought boys were supposed to be the roughest on their clothes!?).

Mending clothing and using up every last bit of soap are nothing special.  But, in this consumer culture, many of us are guilty of putting those worn out jeans into the donate pile, or worse, the trashcan.  I want to fight back against that tendency and Waste Not.

I think my obsession with mending and reusing stems from our compost pile out back.  I've been amazed at what is compostable that I would normally throw away.  Things like shredded newspaper, coffee grounds, tea bags, and dryer lint are a few of the things I've been surprised to learn can be thrown onto the pile.  Who would've thought that I could re-purpose dryer lint, turning it into rich compost, that will turn into beautiful, nutritious garden-grown food for our family?

So, now I keep looking at things I might normally throw away and thinking "What else could I do with this?"  An empty spray bottle became the holder for my homemade hair conditioner.  Newspaper has become pots for starting seeds indoors.  The mesh bags that were the packaging for the bicycle knee pads and elbow pads the girls got for Christmas have been transformed into soap bags, like the one hanging in my shower.  Worn out washcloths have been sewn into reusable cotton pads I use for applying toner in my skin care regimen, and others were cut to size to fit my Swiffer mop perfectly.  Empty cardboard boxes have been broken down and will be used sometime next week as weed block underneath our new raised garden boxes.  The yogurt that was a couple days past date but still smelled just fine made a great treat for the chickens.  And the yogurt container -- who knows?   The possibilities are endless!

Between re-purposing, composting, and hauling things to the recycling center, our family of five can consistently fit a week's worth of trash headed for the dump into one 13 gallon kitchen-sized trash bag -- quite an accomplishment, if I do say so myself.

Perhaps this post can inspire you, too, to stop the next time you're about to toss a holey pair of pants, empty peanut butter jar, or yesterday's newspaper and ask yourself what else you could possibly do with it so as to Waste Not and Want Not.

Storage Problem Solved

The problem:  With 5 busy people in this house and all their school, dance, soccer, AWANA, bike, and cold weather gear, we were having trouble finding WHAT we needed WHEN we needed it.  And don't even get me started on shoes!
So, this pic is what we started with.  This armoire is actually a TV cabinet that we had been using as random storage.  (We sold it for $50 to a FaceBook friend.  That basically covered the entire cost of the project.)  The baskets below are holding the kids' shoes.  The doorway on the left leads to the garage, so this is a highly trafficked area and  one that was not working as hard for us as it could.  It was time for a redesign.
Below is where we were attempting to hang the myriad things we need to be able to grab on our way out the door.  To say that it is overcrowded is a gross understatement.


Solution:  Now, here is the solution I came up with for that wall.  The only thing that stayed was the mirror.  Everything else is new (well, not really "new," just repurposed).

And, here it is once we moved all our gear in.

Here's what I did.  I started with three stacking bookshelves that we already had and lined them up side by side to create a bench.  The collapsible fabric storage cubes hold the kids' shoes.  They each get two cubes and a small space for boots between their cubes.  Lots of stores have these cubes, but I got mine at Home Depot.  I like them because they have lots of color options and have the little pockets that allow you to label the contents of each box. 

To create the seat cushion on the bench, I repurposed an old closet door that we had in the garage, topped it with upholstery batting, and stapled on the fabric (which I already had).  Also in this picture is the 8 ft. piece of pine I bought to stain and use for the long row of knobs.  We bought knobs from IKEA (cheap) and mounted them to the board to create 15 hangers.

For the boot drying rack, I topped a rimmed baking sheet with a cooling rack.  It fit perfectly! Also, it took up the space at the end of the bench that was leftover once I had my cushion on.

For the top level of storage, we cut and painted some IKEA shelving that used to be in the playroom and added more Home Depot storage boxes. 

All told, this was a super-cheap project that allowed us to repurpose a lot of things we already had on hand and left us with a much more usable space.  And the "grab your shoes, backpack, and umbrella" part of our morning went a lot more smoothly today than it has tended to in the past.  :)

Our Compost Bin

So, this is the compost bin I built using 3 (free) wooden pallets.  It's not beautiful, but it sits behind the shed, so we can't see it from the house. It's close enough to the house and the garden plot to be convenient.  I cleared and broke up the ground inside the bin to prepare the spot. Then set up and screwed together the three pallets.  I did not close the bin in so that it will be easier to access and turn over.  However, if you have animals in your backyard, or do not have a completely fenced in yard, you could attach a 4th pallet (perhaps with a hinge?) so that it could be swung open for turning over the pile.

Now, I'm ready to load it up with goodies.  From left to right:  First, I have shredded newspaper straight from our shredder.  This helps to balance the pH levels of the compost.  Next, is my kitchen countertop scrap collecting cannister.  I have it by my cutting board and use it to catch anything that needs to go out to the pile.  (Be sure that this is an airtight container; otherwise, you will have a haven for those little fruit fly/gnat things on your kitchen counter.) Things that CAN be included are any uncooked fruit or vegetable scrap.  Things that cannot be inculded are basically everything else.  This is not just a dinner scrap pile!  Meats or oils will attract animals and will cause the pile to stink.  Lastly, I've included some lawn trash.  Lawn trash can be grass clippings or raked leaves.  It really shouldn't be weeds unless the pile is already established and hot.  Lastly, the pile needs to be damp in order to activate properly.  Just mix all that up and use a shovel to turn it in with some of the dirt below the pile. In a matter of days, it will get hot and the produce scraps will begin to decompose.  Within weeks, I'll have great compost to add to next year's garden!


Now that my pile is established, all I have to do is use my pitchfork every few days to turn everything over and be sure that it stays a bit damp.  Nature does the rest.

We've been recycling for awhile (even though I have to haul it to the plant myself), but I was amazed at how adding composting to our routine has cut down on our trash.  This pic is of one week's worth of stuff I am hauling to the recycling plant.  (I realize that it may not seem very "green" to carry recycling in plastic bags, but after finding the dumpsters at the plant full a time or two and not having a way to dump my loose recycling, I decided that this is the way to go.)

Brace yourself.  This is not a manufactured photo.  I am quite proud of this photo of a kitchen-sized bag of trash.  This is all the trash that our family of 5 will be sending to the landfill this week.  Hurray for us!  Between recycling and composting, we've been able to cut it to this!  You don't have to be an extreme environmental activist to recognize that the less we pile into our landfills the better, and recycling and composting are something that nearly everyone with a little bit of space can do!