Brooding On

New Uses for Old Things

You may remember these from my post on convenience foods.  One of the ways I've justified to myself the purchase of these yummy grapefruit segments was my plan to reuse the containers.
So,  once I'd amassed a good number of them, I set about removing the labels and filling them up with pantry staples.  These containers are great for such uses because . . .
1.  They are wide-mouthed and therefore easy to scoop out of.
2.  They are shaped in such a way that they are easily gripped.
3.  They stack well and are the perfect height to stack two-high on my pantry shelves. 


I usually make use of Goo Gone to get off the sticky stuff leftover from labels.  This time, I used peanut butter and had great results.  I felt a little weird using our organic, unsalted peanut butter that comes from our co-op, though.  Maybe I should pick up a tub of the cheap stuff to use for label removal in the future.  :)

An Alternative to Dryer Sheets

In an effort to reduce our use of things that we just use up, throw out, and re-purchase over and over again, I've been using this replacement for dryer sheets lately. 
All you need is a spray  bottle, hair conditioner, vinegar, and water.  You can make it in whatever quantity you like.  Just be sure to use the right ratio for the mix.  Mix conditioner, vinegar, and water at a ratio of 2:3:6.  I wanted to start with a small batch, so I used a 1/4 c. scoop and the ratio to mix up my first batch. 
(I would prefer to use a "green" hair conditioner but decided to use what I had on hand for now.  This is a hand-me-down bottle from Girl 1 who has now switched a more perm-friendly conditioner.)

To use the mix, just spritz (pretty heavily, I do about 10 squirts from my spray bottle) a washcloth or similar item that's going into the dryer from the wash.  That item that you're washing anyway then acts as the dryer sheet for that load.  I've tried this with my most static-prone items like my silky PJ pants and our fleece jackets and have had great results! 

I often feel like green cleaning alternatives take more time or effort than their store-bought counterparts, so I love that this is not the case here.  I can spritz a towel in about the same amount of time it takes to throw a dryer sheet in, and it takes about the same amount of time to mix up a new batch as it would to write "dryer sheets" down on my shopping list. 

The Crazy Lady with All That Apple Cider Vinegar

At the store recently, I noticed a quizzical look on a fellow shopper's face as I piled multiple gallons of vinegar into my shopping cart.  What in the world could I be using ALL this apple cider vinegar for? 
Well, just today I used it to clean and disinfect eggs brought in from outside.  I also used it as a hair conditioner (the smell is gone by the time you're finished with the hair dryer).  I've also been adding a shot of it to my grapefruit juice in the mornings (it's said to have multiple health benefits, including helping to rid the body of toxins and lowering blood pressure).  And, we add it to the chickens' water periodically to keep them healthy.
Then, of course, there are the more traditional uses, such as pickling.

I also tend to pile the baking soda into the cart.  We make baking soda available to the goats (it eases stomach bloat).  Of course, I use it as a soft scrub for cleaning.  The other night as I got ready for bed, I noticed that I'd used it three times in the span of 10 minutes:  to exfoliate my face, wash my hair, and brush my teeth.  Oh, and I use it for baking occasionally, too.  ;)

If I you're thinking about taking on a more natural approach to household products, I'd definitely suggest building a stockpile of these two plus probably some white vinegar, olive oil, washing soda, and Borax.  I've found it's amazing how many cleaning/toiletries bottles I can toss because they've been replaced by different mixtures of these simple ingredients. 

Fruit Fly Infestation

Okay.  I thought long and hard about whether or not to blog about this.  I mean, some of you may never eat another thing produced in my kitchen after seeing these pictures.
In the end, though, I decided that I really do want this blog to be an honest portrayal of life on our little plot of land, so here it goes. . .

I was gone pretty much from Wednesday to Sunday of last week.  That doesn't happen often.  Anyway, when I got home Sunday night, the compost pail looked like this. 

Fruit flies everywhere!

Okay.  Before you pass judgment and decide that I'm a terrible housekeeper to allow my home to get completely overrun like this, I offer a few pieces of info in my defense:

1.  I left the house in great haste.  So, I didn't empty the compost pail before I left. 

2.  I do my best to keep our kitchen clean, but our kitchen is a REAL, working kitchen.  If yours is too, then you know what I mean.  The fruit on the counter is real, not fake, and sometimes it attracts flying insects.  I cook 3 meals a day, almost everyday, so there's almost always something in process to attract critters.  Try though I might to keep it clean, there's just nearly always something happening in there, and it seems the flying fellas have caught on.

3.  We juice fresh fruit and veggies every morning.  When I left on Wednesday, I'd planned to be home  by Thursday afternoon. I'd left a bowlful of pears sitting out so that they would ripen to perfection in time for Friday morning's juice.  But, then things got crazy and Friday turned into Sunday, and one pear was rotting in the bowl and serving as a veritable fruit fly breeding ground.  Yuck!

Anyway, something had to be done, and since we're talking about the kitchen, a nasty pesticide spray was not the way to go.  A quick Google search turned up lots of all-natural ways to kill off fruit flies.  I decided to try these two:


1.  Add apple cider vinegar to a small bowl and drip a few drops of dish soap on top.  Apparently, the vinegar attracts the fruit flies and the soap keeps them from being able to escape.


2.  A bit more complicated, this one uses apple cider vinegar as an attractant as well.  I'm not going to go into great detail here about how to construct it because overnight, it caught only 2 fruit flies.

Meanwhile, the vinegar/soap trap looked like this in the morning light.  Wow! I'd say this one worked.


Pinterest Cleaning Day!

On my weekly cleaning schedule, Wednesday is Bathroom Day.  As you know, if you read the blog regularly, I don't love cleaning.  I DO, however, love an experiment, so I decided to make today's cleaning more bearable by trying out a couple of cleaning tips I'd pinned on Pinterest.

First off, I planned to try this pin to tackle the soap scum in the shower.  All I needed was vinegar (which we use all the time for all kinds of things, so we always have it on hand in giant jugs like the one pictured below) and blue Dawn (which I do not keep on hand.  Luckily, the 9 oz. bottle is on sale this week for 99 cents at Walgreens).  I put 1/2 c. vinegar in the microwave for 1 1/2 minutes.  Then, I poured 1/2 c. Dawn into a spray bottle.  Once the vinegar was warmed, I added it to the spray bottle and gently mixed the two by turning the bottle.
I doused the shower pretty good and was surprised to see how thick the mixture is.  I just let it sit for 2 hours (while I tried my other cleaning experiment).  At the end of the two hours, I used one of my Grandma Smith's scrubbies that she knits (but any kind of scratchy pad or sponge would do) and went to town on the shower.  I really was amazed at how well the mixture had dealt with the soap scum.  Now, we didn't have just a ton of build-up, but I suspect it would work it's way through even pretty tough scum. 

I'll definitely continue to use this mixture on occasion (looks like I need to get back to the store before the end of the week for some more Dawn while it's on sale).  Of course, because of the Dawn, this mixture is not entirely green, like the vinegar-based cleaner I usually use.  Although, since it's typically used to clean dishes (which we eat off of), it's presumable less hazardous than, say, a cleaner with bleach, Soft Scrub, or Comet.

The other pin I tried was the grout cleaner in this pin.  While I was less than wowed with the results, it was a green option, and it was good to get down on my hands and knees with a toothbrush and really work on some spots that I normally miss with the mop. 

Truly All-Natural Laundry Soap!

Though I've been making my family's laundry detergent for quite awhile, even using Ivory soap doesn't make it completely natural.  Once I began soap making, I set out to create an all-natural soap especially formulated for laundry. 

This Coconut Laundry Soap is all-natural and is formulated differently than body soap (making it much better for laundry use than Ivory).  It contains Coconut oil, which lathers and cleans well but will not build up on fabric and rinses away better than traditional soap during the wash cycle.  This soap is suitable for vegetarians and vegans and is handmade by yours truly.  :)


Since this is a product that is not easily obtained in stores and I've made more than I necessarily need, I'd love to make it available to you via the blog.  If you'd like to order one of the 3 products listed below, please email me (Ashley) at bellerbrood@yahoo.com.

I will sell this soap in 3 different forms:

1.  Baggie of Shredded Soap.  If you plan to add the soap to your own laundry mix, this just saves you a step.  This amount is enough to mix with a full box of Borax and Washing Soda to create enough detergent to last you months. 
$5.00 + cost of shipping (if applicable)

2.  1 qt. jar of prepared laundry detergent.  If you haven't yet tried homemade laundry detergent, this would be a cost and resource-effective way to try it without a big commitment.  This jar, containing a mix of Borax, Washing Soda, and my Coconut Laundry Soap, is ready to use and since it takes only 2 Tbs.-1/4 c. per load (depending on your water), it should last you long enough to decide whether you'd like to continue using DIY laundry detergent.  In fact, this one jar should last about 30 loads.
$3.00 + cost of shipping

3.  Bar form.  This bar is 2" in diameter.  It can be shredded to add to your own mix of detergent or can be used in its bar form as a stain pre-treater. 
$2.50 + cost of shipping (if applicable)
(Available 6/27)

DIY Dish Detergent

I'm declaring victory!  I've finally found a DIY dish detergent that works well with our machine and water.  This has been no small feat.  I think I've tried 5 different combinations over the past several months.  All past trials have resulted in various degrees of film left on the dishes.  I recently discovered (Thank you, Sears repairman) that we have high amounts of calcium in our water that is causing build-up on our dishes as well as on the inside of our machine.  Most DIY detergent solutions just aren't equipped to deal with that much calcium. 
And, it should be said, I run my dishwasher A LOT!  We don't use paper plates; we all eat breakfast and dinner  here nearly everyday;  2 (sometimes 3) of us eat lunch here daily; our juicer parts take up significant space on the top shelf; and I'm not a fan of handwashing when I have a machine that will do it for me.  All of this means that I run our dishwasher at least twice a day.  So, having a dishwasher that does its job and does it well is a priority.  

This recipe is actually my own combination of several recipes I've tried. I've been using it now for about 2 weeks and think I've now got a good handle on the ideal proportions, so I'm ready to share it with you!

 
Here are the ingredients.  (Yes, that's rice you see.) You'll notice that it includes Cascade Complete, which is not a green solution. If you are looking to go entirely green with your detergent, this is not the solution for you.  However, I'm convinced that the green DIY solutions just aren't gonna cut it for my water.  This recipe allows me to use significantly less Cascade than if it were my primary detergent and, in the process, saves me lots of green (cash, that is).

I make a small batch because I have a small container and because I only have to use 1 Tbs. per load.  After all, this mixture will provide me with detergent enough for 64 loads.

Mix together the following:
1 c. Arm & Hammer Super Washing Soda
1 c. Borax
1 c. Cascade Complete
1/2 c. Lemi-Shine
1/2 c. rice

The skinny on the ingredients:
The Washing Soda and Borax naturally stretch the cleaning power of the Cascade Complete.  I always have these 2 ingredients on hand because I also use them in my DIY Laundy Detergent. The Lemi-Shine was recommended by the aforementioned Sears repairman and helps keep that yucky film off the glasses.  All of these ingredients are likely to solidify into one giant mass in my container, if left to their own devices.  The rice serves to absorb excess moisture and keep the mixture scoopable.  It's not a problem to have it in the dishwasher as it washes away during the cycle.

Mix it all together in container; throw in a Tbs. scoop and a label; and you're ready to wash.

The skinny on the savings:
At 20 cents per load, Consumer Reports considers Cascade Complete powder a real value.  After all, if you're using some of the new, trendy gel packs, you're paying more like 40 cents per load. 

This above recipe, however, comes out at just over 6 cents per load, a value unheard of on the supermarket shelf.

If you've never had problems with film, I'd give this mixture a try without the Lemi-Shine (which is the most expensive ingredient), and you'll save even more.  But, for those of you who, like me, are plagued with super-calcified water, give this recipe a try.  And, please report back.  I'd love to know how it worked for you!

An Update on the Goats

As an Oral Communications and English teacher, I liked to have my students read a funny article I'd stumbled across that mocked Crocs shoes.  The article was hilarious, and the students greatly enjoyed it.  Well, I'm sure those past students would have fun with this.  Yep, that's a pair of Crocs (or Crocs knockoffs) for each member of the family.  Aren't they stylish?  After I had to scrape the goat poo from Little Boy's church sandals just as we were ready to head out the door, I decided that we had to have backyard-specific shoes.  They needed to have a covered toe and able to be easily cleaned off with the hose.  What better solution than a family supply of Crocs?  The rules are that they are the only shoes allowed in the backyard, and they are NEVER to enter the house.  So far, this solution is working really well.

Razz has been producing 5-6 lbs. of milk per day (nearly 3 quarts).  We are loving milking her, and she has gotten very comfortable with the process.  She just jumps right up on the milking stand when it's time.

Poor Izzy

Poor little Izzy is being weaned right now.  Have you ever been around a goat being weaned?  Do you know how hard it is to let your baby "cry it out" in the night?  This is nearly as bad.  To wean her, we separated her from her Momma by putting her and her buddy Dallas in the old dog pen.  Basically, she and her Momma, who's across the yard, just cry back and forth to each other ALL DAY LONG.  It's pretty sad to listen to, but it's necessary.  Izzy is really too big to be nursing, and Razz has been trying to kick her off since she's been here.  It's time, but that doesn't make it any easier.  Meanwhile, John and I had to sleep in the guestroom because the dog pen is just outside our bedroom window and Izzy started back in with her whining about 11:00 last night.  The guestroom is on the other side of the house, so once we moved, we were able to get a good night's sleep (which is a good thing, since we were outside and ready to milk at 5:45 this morning).


And, of course, there's little Copper, the kids' absolute favorite!  They love to get him out of the pen and lead him around the yard (careful to avoid the azaleas -- fun fact: they're toxic to goats).

Not only are the kids enjoying playing with the goats, they're also enjoying the milk.  Here's Girl 1 showing off her milk moustache.  When she first tasted the milk, she said, "Wow!  It tastes like Razz-gular milk!"  She loves a play on words.  ;)

Girl 2, who doesn't normally care for milk (unless it's chocolate), even guzzled a glass.

My cheese-making supplies have arrived and as soon as I've got a gallon saved up, I plan to try my hand at some Chevre cheese.  So excited!

Scary Places!

At the risk of sounding like a horrible housekeeper and thus mother, I need to make a confession.  I have scary places in my house.  These places frighten me because they are dark and seldom accessed and thus they are never cleaned.  However, during this round of spring cleaning, I am facing my scary places head on.  For example, under the stove.  I mean, it's just dark and weird under there.  I confess that if a crumb or marble or silly band bracelet makes its way under there, I will not be reaching my hand into the dark abyss to retrieve it if it's not visible.  It's just considered lost.  But, this is the kind of thing my spring cleaning has been all about this year.  Do you have scary places, or is it just me?

Also, while I'm getting things off my chest, I should add that my "spring cleaning" is a bit misleading.  I was confessing to my mom that I've been cleaning things that I haven't cleaned in a LONG time.  She tried to comfort me and help me feel like not such a bad housekeeper by reminding me that "they call it 'spring' cleaning for a reason."  The implication, of course, is that it's something done once a year.  If that's the case, then perhaps what I'm doing is Leap Year Cleaning, because I'm doing some stuff that just doesn't get done every year. 

What can I say?  I love an organized closet, drawer, or cabinet, but I'm not nearly as concerned about dusting them.    And, that is why, when I clean, I reward myself by also getting to re-organize the cleaned spaces.
Ahhh.  A place for everything and everything in its place!  If you are not one for organization, please allow me to make a suggestion.  Start with your silverware drawer.  It's probably the drawer you open most often in your house.  Thus, your organized drawer will make you smile an average of 7 times a day (or however many times you open it), and it just may inspire you to organize some other spaces.  Maybe even your scary spaces.  ;)

Laundry Closet Re-organization!

I'm working my way through the house doing spring cleaning with a plan completely stolen from my friend Ericka -- tackling one room per week with a deep clean.  In the process, I've discovered something about myself.  I LOVE to organize, but  I HATE to clean. 
Aside from the rug in front of the kitchen sink, I probably stand still the longest in one day, in this spot right here, folding and hanging clothes.  So, I've been very happy by how much this little re-organization project has helped simplify my laundry routine.
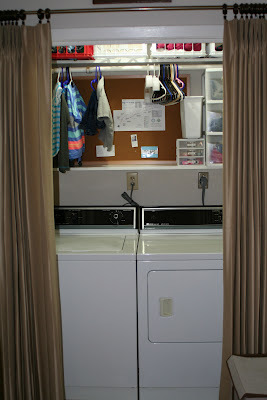
As you can see, we have more of a laundry closet than a laundry room.  This arrangement is fine by me because I'd rather not be shut off in a small room by myself folding clothes anyway. However, the closet leaves me with a small space in which to get a big job done.   But, since the re-design, it's working out great!  1st, notice the curtains.  They can close off the space so that I can hide it all when company is over (although now that it's so organized, I may not be drawing the curtain so often anymore).  Also, the bulletin board can hold little snippets from magazines, Bible verses, inspirational quotes, pictures, or stain removal tips. 

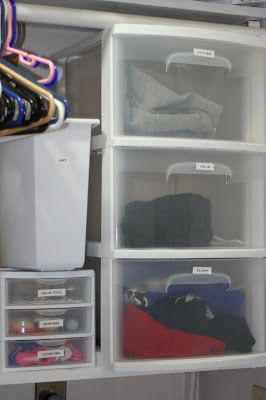
On the shelf above the machines, I've added these plastic drawer systems.  The big one has one drawer for each child.  I put all of their clean undergarments, pajamas, and socks into their drawers (at our house, we hang everything else).  When the drawers are full, I pull them out and take them to the bathroom  (where the kids keep all of these clothing items).  When the kids see their drawer sitting on the bathroom countertop, they know it's their job to put their things away and return the drawer to the laundry area (and, yes, even my 2-year-old son can do this :)  The smaller set of drawers holds collar stays (which go in all my hubby's dress shirts, extra dryer bars (we've switched to those instead of dryer sheets), and clothespins.  Atop those drawers is a small trashcan to collect dryer lint (it's compostable, you know) and extra hangers at the ready.

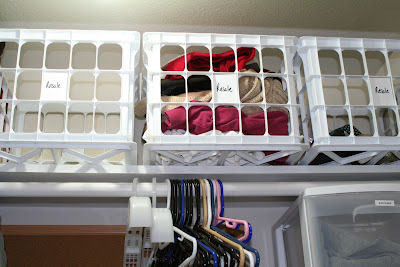
At the very top of the closet, I have crates labeled "Resale" to collect the clothes I plan to put into the kids' consignment sale I participate in twice a year.  So, when I wash that t-shirt that has begun to fit like it should be made of spandex, I can just pull it from the dryer, fold it neatly, and tuck it away in a resale crate until I'm ready to do my tagging for the sale.

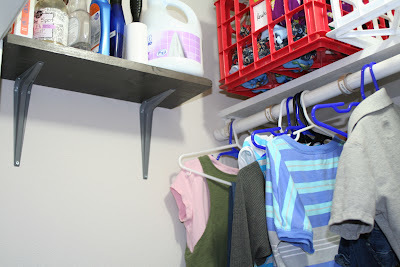
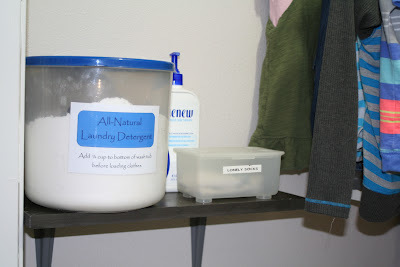
Above the washer, the closet rod is divided up into three sections so that I can organize the kids' clothes as I hang them up.  Also, my hubby put up two new shelves for me on the left-side wall of the closet.  One is up high and holds laundry items that I don't need as frequently.

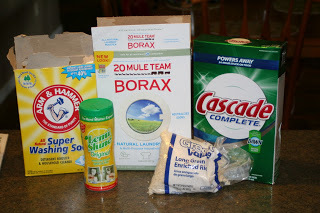
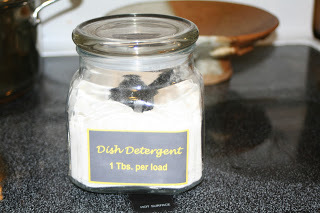
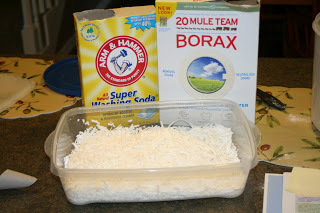
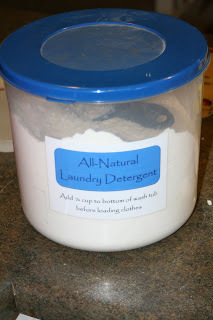
The other one, which is lower, holds my detergent, lonely sock bin, and lotion (does folding laundry make anyone else's hands crazy dry?).

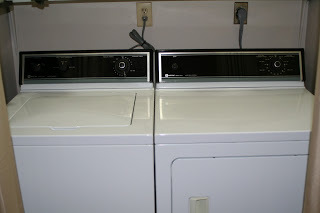
This may well be the best part of the whole project-- there's nothing on the top of the machines!  It's completely free for folding.  So, while I may not have loved vacuuming dryer lint off the power cords or handling the sock retrieved at long last from down the crack by the washer, I am loving the fruits of my labor -- a clutter-free work space!

DIY Laundry Detergent

This easy-to-make laundry detergent contains only 3 ingredients and does a super job.  The recipe I found calls for the following:
1 bar of Fels-Naptha or Ivory, grated
2 c. Arm & Hammer Super Washing Soda
2 c. Borax

 When I make it, I want to make a big batch, so I just dump in a whole box of Borax and Washing Soda and add about 4-5 c. of grated soap.  I've used the Fels-Naptha and Ivory but prefer Ivory because it is 99% pure and doesn't have as strong a scent. I use my food processor to grate the soap in big batches.  I will go ahead and grate a whole package of Ivory soap bars then store the excess grated soap in a container until I need it.  That cuts down on the number of times I have to clean the food processor.
Mix well.  If you have hard water, you may need to use 1/4 c. per load.  I have soft water and can get away with using only 2 Tbs. per load.  Either way, this is a cheap alternative to store-bought. 

If you prefer a liquid detergent, my friend over at Nesting Place has a recipe for DIY liquid that she says works great.