Brooding On

"Spring" Cleaning: Kitchen Edition

Yes, I realize it's not spring yet.  But, here's the deal:  spring is going to be full of gardening and seed starting and goat kidding and maybe bottle feeding (goats, not children -- thankfully, we're beyond all that around here! In fact, this past week was a monumental one in terms of our kids growing up -- we are a Pull-up-free house.  That's right my friends, for 8.5 years, we have purchased either disposable diapers or Pull-ups.  But, no more!!!)

Sorry.  I digress.  Anyway, it occurred to me that I really ought to be doing winter cleaning.  Who wants to be outside right now anyway?  It's CRAZY cold out there, people! 
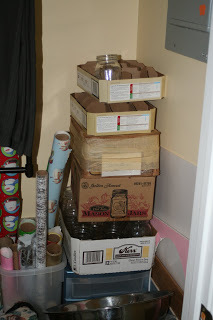
And, since the guest room closet looks like this, with canning supplies stacked about 5 feet high, I decided to start by cleaning/organizing the kitchen.  My goal was to clear enough cabinet space that I could move all my canning supplies to the kitchen.

My basic plan of attack is . . .
1. empty cabinets/drawers
2.  clean and re-line cabinets/drawers
3.  decide what to keep/what to donate
4.  re-stock in the most organized/logical way I can come up with (based on where in the kitchen I use the items and how frequently they get used)


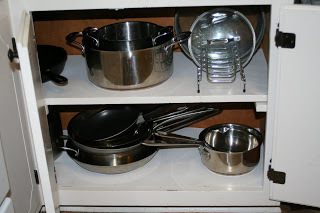
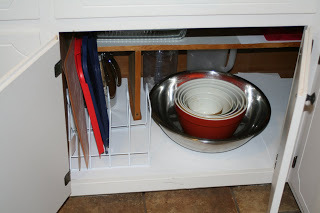
I use posterboard to line my cabinets.  So that is doesn't peel up during the year, I hot glue it to the cabinet in the front and at corners.  Each year, I remove the old liner and use it to measure and cut the new piece.  I've never used a lid organizer before for my pan lids, so I'm pretty excited about this addition (it's the little things sometimes ;).

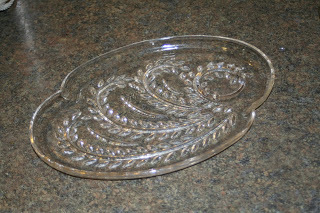
If I didn't use an item in the past year, it went to the donate pile.  No exceptions.  Okay, fine --one exception.   And I deliberated on it for awhile.  By scavenging second-hand shops, I've managed to amass 20 of these antique snack trays.  On the right side, they have a raised ring to hold the matching adorable punch cups.  I've used a few through the course of the year (when I want my lunch to feel fancy ;). But, I've definitely not hosted the ladies for brunch to put all 20 to use.  Still, I love them.  And, I just couldn't part with them.  I compromised.  Since the cups look very similar to the ones that came with my punch bowl, I got rid of the punch bowl cups.  Now, I've got just 20 glass cups that can be used with my punch bowl and/or snack trays.  Now, I just have to be sure that I use all 20 before next year's clean out, so that I can justify keeping them again! 


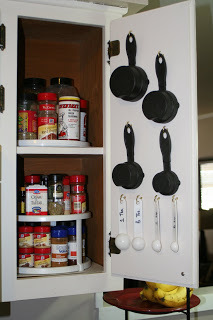
I added these little cup hooks (8 pack for less than a dollar) to hold my measuring cups and spoons inside my spice cabinet door.  This door is directly over the cannisters I use to store my flours and sugar, so it seemed like a handy solution.

Speaking of countertops, my January issue of Real Simple suggests that only appliances that get used at least once a month get to take up countertop real estate.  All others should be stored and pulled out for use.  Ummm.  There's no way I could fit all the appliances I use every month on my countertops!  There'd be nowhere to work! 

So, my rule is if it's super heavy (stand mixer) or gets the most frequent use (juicer) or would make a mess to move (toaster), it gets a home on the countertop.  This relegates the blender and food processor to the cabinet, but they're stored right below where I plug them in, so I don't have to move them far.

Another suggestion:  if you can't figure out a good way to organize the chaos, just settle for corraling it.  See the red bin?  It holds all the weird tupperware-type containers that I send to school in the girls' lunches.  I just toss the containers and lids in to the basket, so it's not exactly organized, but at least it's not visual clutter when I open up the cabinets.

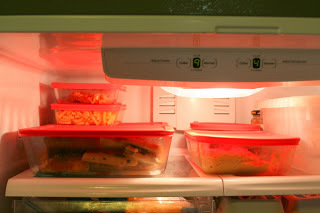
Speaking of Tupperware, I probably have less to corral than the average gal because last year, I splurged and bought us these Pyrex containers instead.  And this girl LOVES her Pyrex!  What's so great about them?
1.  I can see all my leftovers without having to pop the lid and peek in.
2.  Their rectangular design makes them easily stackable in the fridge.
3.  They're glass, so I can pop them in the microwave to reheat things.  (I know a lot of people still reheat their food in plastic containers and live to tell about it, but my husband WOULD NOT have it at this house!  He's not super particular about many things, but microwaving in plastic is a big no-no with him.)

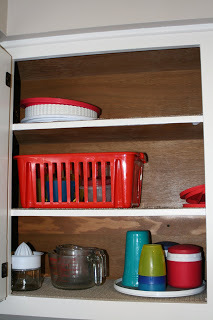
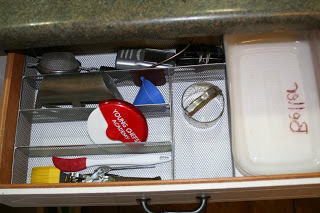
More lid storage -- I think I'm gonna love this!

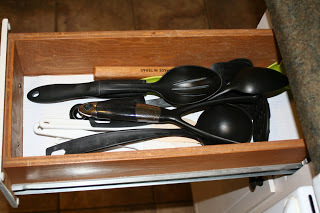
I've winnowed down my long-handled utensils to just these.  I can't think of any good reason I should have 5 spatulas and 4 slotted spoons that are exactly the same.  For that matter, how in the world did I amass 5 9x13 glass baking dishes? 

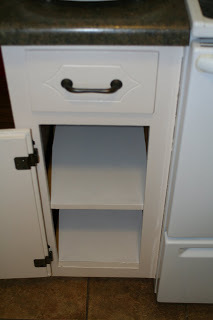
This drawer isn't even full.  In fact, lots of drawers and cabinets have extra space now that I'm finished -- even with all my canning supplies moved in.

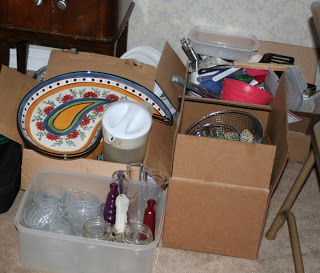
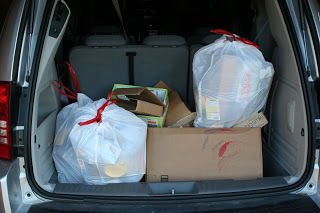
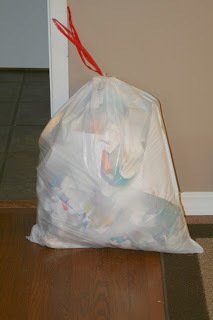
And, this is the pile (yes, it's in the guest room) of stuff to donate.  Keep in mind, I got rid of just as much stuff during last year's kitchen clean out.  If I'm not careful, there'll be nothing left in a few years!
But, my kitchen is a workhorse.  It's where it all goes down around here.  The last thing I need is extra stuff just taking up space in there.  I can take or leave the cleaning part of this process, but the organizing I LOVE!

Have you got any suggestions for cabinet or closet cleanouts?  I think the pantry is next for me -- it could get ugly!

Free Gift Wrap!

What could be better than free wrapping paper for the holidays?  How about gift wrap that allows you to reuse something you would otherwise throw away?  Or how about gift wrap that can be recycled once gifts have all been unwrapped?

Sounds good, huh?
Last year, we wrapped in newspaper, which was fun.  This year, I decided to use the packing paper that fills every package we get from Amazon (and because we live where it's hard to do much local Christmas shopping, we get A LOT of Amazon boxes around the holidays.)  The ribbons are salvaged from gifts we've received in years past, and the gift tags are made out of Christmas cards we received last year, cut out with fun scrapbooking scissors. 


They really pack so much of that paper into these boxes!  The boxes themselves make a great kill mulch outside.  If you have an area that you'd like to plant in the spring and need to kill the grass, lay down a bunch of cardboard now, hose it down, and you'll be ready to go come spring.

Oh, and since it's apparently the thing to do to post a pic of your tree online, here's ours.  John says it looks like it has hair!  ;)  This is "Momma's tree."  I decorate it, evenly spacing the ornaments that are all of one color family.  I LOVE my tree.  If I were choosing decorations again, I probably wouldn't go with these, but I'm not about to spend $ on new tree decorations.  It's the lights I enjoy most anyway.  I like to sit in its glow in the early morning with a cup of coffee.  Quiet Christmas tree moments are the best!

Upstairs, we have the kids' tree.  They decorate it entirely on their own, and it's full of the more colorful ornaments, including, of course, all the awesome handmade ones they bring home from school each year.  Of course, there are no ornaments at the top because they can't reach that high!  But, I love that about it.  They want their ornaments to be where they can see them anyway!  So, the downstairs tree may be classically beautful, but it's the upstairs tree that tells the stories.

Greywater Solutions

First off, let's define greywater for those of you who may be unfamiliar with the term.

"Greywater is wastewater generated from domestic activities such as laundry, dishwashing, and bathing, which can be recycled on-site for uses such as landscape irrigation and constructed wetlands. Greywater differs from water from the toilets which is designated sewage or blackwater to indicate it contains human waste."

Thank you, Wikipedia.  Green and sustainable houses can make great use of greywater, but these systems are typically much easier to install as a house is being built.  Adding the plumbing necessary for greywater systems that take full advantage of shower, laundry, and dishwashing water is difficult once the house is already established. 

There are, though, some other ways to make use of greywater.  One of those ways is with the AQUS.  This very cool system is affordable at just $200 and supposedly easy to install.  The system hides under your sink and reroutes the water that goes down the sink to the toilet.  Once the water reaches the toilet and is flushed, it leaves the house through your existing plumbing system.  This is a great option for those who'd like to make better use of greywater but aren't planning a new build anytime soon.

We've got the AQUS on a wishlist but haven't yet tried it out ourselves.  We are, however, taking advantage of greywater in one of the easiest ways possible. 
See the grey bucket? 

I realize that this solution isn't for everyone.  Not everyone could tolerate a bucket on the floor, but it really doesn't bother me and just sits right next to the trash and recycling cans.  Anytime I have extra water involved with dishwashing or the kids didn't drink all their water at dinner, etc., I just pour the water into the bucket.  When the time comes, I then tote the bucket outside and use it to water all my potted plants on the front and back porches.  Blossom, our inside cat, is a fan, too.  She thinks it's her very own giant water bowl. :)

The Man Who Quit Money by Mark Sundeen

From the Amazon book description:  In 2000, Daniel Suelo left his life savings-all thirty dollars of it-in a phone booth. He has lived without money-and with a newfound sense of freedom and security-ever since.
The Man Who Quit Money is an account of how one man learned to live, sanely and happily, without earning, receiving, or spending a single cent. Suelo doesn't pay taxes, or accept food stamps or welfare. He lives in caves in the Utah canyonlands, forages wild foods and gourmet discards. He no longer even carries an I.D. Yet he manages to amply fulfill not only the basic human needs-for shelter, food, and warmth-but, to an enviable degree, the universal desires for companionship, purpose, and spiritual engagement. In retracing the surprising path and guiding philosophy that led Suelo into this way of life, Sundeen raises provocative and riveting questions about the decisions we all make, by default or by design, about how we live-and how we might live better.

To say that I enjoyed this book would be an understatement.  I'd recommend it to anyone.  I will warn you, though, that it will challenge you.  So, if you're quite complacent with the way you view the world and its workings, you may just want to avoid this one.  So, if you don't run out and buy it, at least humor me and check out the excepts below.  These are from the final portion of the book wherein Sundeen ponders what it is we Americans have to learn from folks like Suelo.

The author is writing about his own journey and recalling when he began reusing baggies and carrying reusable bags with him to the grocery store . . .

But here was the problem:  although these actions made sense, they didn't make me feel any less anxious, or more free.  How many times have I stood at the kitchen sink paralyzed by a plastic baggie?  If it were clean, having held, say, a sandwich, I'd simply rinse and resuse it.  But this one is smeared with mustard and rancid cheese and even a bit of mold.  My instinct is to throw it away.  But as we have learned, there is not such place as "away."  This plastic bag, if it doesn't end up clogging the intestines of some albatross or dolphin, will swirl at sea for decades, and even after it breaks down into tiny pieces, it will never fully decompose:  its toxic petrochemicals will haunt us forever.

But then I think:  That's ridiculous.  It's just one baggie.  And the washing of it will not only be a singularly unpleasant use of my time, but won't I be using precious water to wash it?  And burning natural gas to heat that water.  Not to mention the resource depletion and damage represented by the soap.  And by now I've already wasted five rminutes thinking about this, time that could have been better spent picking up plastic bags along the river. 

So I chuck the thing in the trash, but the next day at breakfast it's still there, peering up at me accusingly.  And the gears of my mind spin. Eventually, one day in the future, I'm going to need a plastic sandwich baggie.  And when I do, I'm going to buy a box of them, thus giviny my hard-earned money to the Ziploc corporation, or whoever, who doubtlessly engages in all sorts of toxic practices to manufacture these things -- I imagine a factory spewing brown sludge into a river, somewhere in the Rust Belt, or maybe China.  And I'll also be enabling my box of baggies to be hauled across the nation on gas-guzzling trucks that grind up the taxpayer-funded highways, which carve through the habitat of grizzles and moose and antelope, driving them toward extinction, and so on. 

Finally, I had to ask a therapist about this, and he said, "Why don't you try going outside and growing something?"

I guess I love this excerpt so much because I've experienced this "baggie moment" myself.  In fact, in moments like this, I almost envy those who've never given a second-thought to the environment or the impact their choices make on it.  But, what I love here is how the therapist redirects that "guilt" and asks him to do something about it.  Because it's true, when I carry my reusable bags to the grocery store and see the bazillion plastic bags being loaded full of groceries in every other checkout lane, I wonder how much of a difference I can really be making.  But, when I plant my garden, I know I'm doing something positive.  And, it directly impacts me and my entirely family.

And for all of you who are engaging in the struggle:

This whole project of changing the world is hard work.  And as much as we seek a balance, straddling the line between individualism and community isn't a recipe for freedom.  It's the opposite.  When you try to balance the anxiety of maintaining wealth (savings, mortgages, insurance) with the anxiety of being an ethical person (eating local food, lunching with hobos, reusing baggies, withholding taxes), you don't free yourself from either.  You end up with twice the anxiety. It's sort of like going on a diet.  Unless you're willing to go all in -- run six miles a day and eat only fish and broccoli -- you'll never have those sculpted abs you see in magazines.  But neither will you have the unabashed joy of scarfing double-frosted chocolate cake.  Instead you nibble away at half a piece, your enjoyment negated by your guilt that you couldn't refuse it altogether.

Happy Earth Day!

Happy Earth Day, everyone!  This is the day set aside to celebrate the beautiful earth God has entrusted to our care.  On this day, millions of people will join in the celebration by committing to do acts of green.  The  most popular act of green commitment is switching from standard to CFL lightbulbs.  We went on a hunt and found one standard bulb in this fan upstairs that we could switch out (wouldn't you know, it was already burned out!).  We do still have a few standard decorative bulbs in our bathrooms, but otherwise, I think we're entirely switched over now.

Also, we walked to church today.  We do this nearly every Sunday as it is right next door.  In fact, the kids think it's really funny when we drive to church on rainy days.  When we get to the end of the driveway in the car, John announces, "Okay, kids, we're going to church."  Then, about 3 seconds later, as we turn into the church parking lot, "Okay, kids, we're at church!"  It's a joke that never grows old.  They crack up every time!

Another act of green that we committed to do is to eat more local food.  It hardly gets more local than your own backyard!  This, our root box, has the most things in it right now.

Here's what the garden looks like today.  Lots of things are now in and growing. 

How have you shown kindness to our earth today?

Replacing Paper Towels


In an attempt to reduce our use of paper products, we've been using Flour Sack Towels in place of paper towels for a couple of months now. 

These towels are wonderfully absorbent, can be laundered with a bleach alternative to keep them white, and wash and dry up great.  Click here to check them out on Amazon.

I read about a family that replaced their bath towels with flour sack towels as well.  They did so because their reduced size meant less water spent in washing them and they line dry quickly, reducing dryer use.  We haven't yet made that switch.  I rather enjoy wrapping up in my big cozy towel, but we'll see.  Maybe in the summertime I'll give it a try. :)

Reusable Facial Cleansing Pads

In our home, we try to limit the trash we sit by the curb as much as possible.  Between recycling, reusing, composting, and feeding scraps to animals, we're able to cut our waste tremendously.  We then started taking a close look at what non-edible consumables we are buying (things like toilet paper, paper towels, kleenex, and napkins) and seeing what we could replace with reusable products.  One day, as I was washing my face and applying toner on one of those little round cotton pads, I realized that they were one of our last non-edible consumable hold-outs.  You may use cotton balls instead, but you know the kind of thing I'm talking about.  They may be sitting on your bathroom countertop in a cute little holder like this.

To end my use of the disposable cotton pads, I fashioned these little reusable pads that I can just toss into the wash.
They are about 1.5 x 3" which gives me plenty to hold onto when I'm using them and makes them substantial enough that I can find them when they come out of the dryer.  Each one is made of two different fabrics.  I used mostly flannel scraps that I had on hand and old baby washcloths that I had already moved to my rag basket.  I sewed the two layers together as if they were going to be little pillows, leaving enough area open to turn it right-side-out.  Once turned, I sewed around the outside edge to make them lay flat.  I've been using them for a couple months now, and they've held up great!  

I'd love to hear from you: 
What non-edible consumable are you still buying and would like an idea about how to replace it with something reusable?  Or what non-edible consumable have you quit buying?  What did you replace it with? 

DIY Laundry Detergent

This easy-to-make laundry detergent contains only 3 ingredients and does a super job.  The recipe I found calls for the following:
1 bar of Fels-Naptha or Ivory, grated
2 c. Arm & Hammer Super Washing Soda
2 c. Borax

 When I make it, I want to make a big batch, so I just dump in a whole box of Borax and Washing Soda and add about 4-5 c. of grated soap.  I've used the Fels-Naptha and Ivory but prefer Ivory because it is 99% pure and doesn't have as strong a scent. I use my food processor to grate the soap in big batches.  I will go ahead and grate a whole package of Ivory soap bars then store the excess grated soap in a container until I need it.  That cuts down on the number of times I have to clean the food processor.
Mix well.  If you have hard water, you may need to use 1/4 c. per load.  I have soft water and can get away with using only 2 Tbs. per load.  Either way, this is a cheap alternative to store-bought. 

If you prefer a liquid detergent, my friend over at Nesting Place has a recipe for DIY liquid that she says works great.

Make Your Own Garlic Croutons

At our house, the heels of the bread loaf are not super popular.  So, when we get to the end of a loaf, I'll add the heels and any bread that may borderline stale to the plastic gallon baggie I keep in the freezer for this purpose.  Once I've got enough heels collected (and my crouton supply needs to be replenished) I pull them out to thaw.  I preheat the oven to 350 degrees, cut the bread into cubes, and toss into a big bowl.  Melt some butter or margarine (about 1 Tbs. per cup of bread cubes) and pour it over the bread.  Stir.  The cubes should look damp but not drenched.
  Spread the bread cubes out on a baking sheet and sprinkle generously with garlic salt.  When it comes to garlic salt, "more is more," as they say, so don't scrimp.  You could always use different seasonings, but I like garlic salt because it's super-flavorful and super-cheap.   Bake for 20-25 minutes, stirring periodically.  They should all be crisp and browned slightly.

Allow to cool, then store your croutons in your repurposed jars.  We eat a lot of salad, so I've never actually had the opportunity to test this out, but I think they ought to stay good for at least 2 weeks.

DIY Tooth Powder

It occurred to me this morning as I was brushing my teeth that I haven't yet blogged about this most amazing homemade product!  Now, I admit, tooth powder is not for everyone.  After all, it is not a paste, so that will turn some people off, but hear me out. 

Why should you consider switching to the DIY tooth powder?

1. It's crazy cheap.  We're talking pennies a jarful (once you've got your jar).
2.  It does an excellent job cleaning.  John and I have both been using this for a couple months now.  I had remarked early on that I felt it was getting my teeth cleaner than our good 'ole paste.  And, when John went to the dentist and confessed that he'd not really been flossing, the dental tech was surprised by his confession because his teeth looked so clean; she never would've guessed he'd not been flossing.
3.  Have you ever noticed that lots of the toothpastes marketed for whitening also tout that they contain baking soda?  Well, my teeth are markedly whiter since I've been using this powder.
4.  You may think I'm grasping at straws here, but when you use this product, your spit is acting as a twice daily drain cleaner.  Baking soda is a key ingredient in most green drain cleaning solutions, so with each brushing, you're working to undo the hair clog that may be building up down the line.

Convinced?  Here's how to make it.  It's very complicated (**read with heavy sarcasm**).
Gather up you baking soda, peppermint extract, and a jar of baby food.  Yes, it must be mashed green beans.  Only kidding.  In fact, any small empty jar you have lying around will do.
Fill your clean and dry jar to nearly full with baking soda and add a few drops of peppermint extract.  Shake.  Yep, it's that easy.

How do you use it?  Each person using the tooth powder needs his own jar (to make things more sanitary).  When you're ready to brush, run your toothbrush under running water and dip it into your jar of powder.  This will cause just the right amount of powder to stick to your brush.  Brush your teeth as you normally would.  If it feels a bit too grainy for your liking, add some water by running your brush under the water again.  Rinse your brush, and you're done.

Disclaimer**  I will say that if you have very sensitive teeth, this powder may not be for you as the baking soda may be too abrasive.  Also, I'm not sure I'd recommend it for kids.  First off, I think that putting glass jars in my kids' bathroom and asking them to handle them is just a mistake.  Secondly, after seeing what they are capable of with baby powder, I shudder to think what kind of "artwork" they could dream up with baking soda.  And, thirdly, if you live somewhere without fluoridated water, as I do, the kiddos probably need the fluoride provided in lots of kid-friendly toothpastes.
:)

Foaming Hand Soap

At our house, we go through a lot of hand soap.  Particulary, I love foaming hand soap, because I think the kids it doesn't make as much of a sticky mess when the kids get it all over the bathroom. So, I was quite happy to discover a way to save $$ on it.  If you've discovered Pinterest, you've probably aleady learned this, but I'm willing to risk being "so last week" for the sake of those of you who haven't yet discovered this money saver (the "money saver" being DIY foaming soap, not Pinterest -- defnitely not Pinterest.  If I followed through on even half the projects I've pinned on there, I'd be knee-deep in debt to Hobby Lobby). 

There's a little secret that you need to know about foaming hand soap.  Lean in, and I'll whisper it to you.  Ready? 

It's just watered down soap.  What makes it foam is the special pump.

Seriously. 

So, when you run out of your watered down soap you paid $3.50 for at the store (I'm not mocking you. I did it, too), save that bottle!  Add 1-2 Tbs. of soap to the bottom of your empty bottle.   To keep it pure, try Dr. Bronner's liquid castille soap and fill nearly to the top with water.  Gently turn the bottle to mix the soap with the water (don't shake or you'll just create a bubbly mess).

Now, you've just spent pennies on a bottle of hand soap, which I know from experience will make you less upset when you see that half the bottle has been squirted out all over the bathroom counter.  :)

Kids Sale Update

For those who read my blog about the Popsicles Kids Sale (and how great it is!), I thought I'd give an update on how it all turned out for us.  I was able to get most of the stuff missing from my kids' clothing inventory lists.  One big challenge is always finding the girls shorts and shirts that are okay for school (no more than 4 inches above the knee and straps at least 2 inches wide) as the sale is full of little tanktops and shortie shorts.  Overall, I did really well, though, and had a great time with my friend :) who was able to go with me.  I spent about $170 ($20 of which were on toys -- the kids have come to expect a surprise when they wake up the morning after a kids' sale-  it's like Christmas morning around here). 

After all my shopping, I was still missing a few pieces for the kids, so I got online and ordered the rest from Old Navy (who was having an online sale) and spent another $100.

The sale is now officially over, and I earned $336.25.  So . . .
  $336.25 Earned
-$170.00 spent at sale
-$100 spent at Old Navy= $66.25

Yep, I may have to fill in a few gaps in the months ahead as needs arise, but for now, I've basically wardrobed 3 kids for spring and summer and come out $66 ahead.  Not bad!

How to Clothe 3 Kids on the Cheap

I have 3 kids -- Girl 1, Girl 2, and Boy.  You might think that Girl 1 can just pass her stuff down to Girl 2, so I'm only ever shopping for 2 kids.  Those who think that need to look again at how the two of them are built and reconsider.  Last year, I tried to put a pair of Girl 1's old jeans on Girl 2.  Sure, they were more than a little bit too long, but I'm resourceful enough to cut them off and re-hem.  The problem was that Girl 1 had worn holes in the knees (that's fashionable, right?), which hit Girl 2 about mid-shin.  They looked absolutely ridiculous.  So, while a few items can be passed down each year, we are still left with mounds of outgrown clothes and nearly bare closets as the new seasons roll around. 

Those who know me best know the following:
1.  I am an anti-hoarder.  In fact the show Hoarders is nearly enough to give me an anxiety attack.  I haven't always been this way.  I blame Hurricane Katrina, which taught me many things, one of which is that stuff is just stuff.  If I haven't got a good use for it, why would I keep it?  This is especially true if I can think of someone else who might be able to make use of it.
2.  I am cheap.  If it's not on sale, I'm usually not interested.  I make exceptions, of course.  But it is the exceptions that prove the rule.
3.  I have very few options when it comes to shopping for adorable kids' clothes.  We live 1.5 hours from a Children's Place, Old Navy, or GAP, for example, so the quick little jaunt out to grab a new outfit for a special occasion is usually not an option.
4.  I'm a planner.  I am borderline crazy when it comes to organization and planning. 

For all of the above reasons, I'm the perfect candidate for the Kids Consignment sale circuit.  If you haven't already discovered the beauty of these amazing sales, hear me out.  Based on conversations with countless others, I think the best sale close to me is the Popsicles Sale in Jonesboro.  This sale, held twice a year, provides me with the opportunity to sell my kids' outgrown things and score them entirely new wardrobes in the process.  I do all the sorting, washing, ironing, hanging, label creating, tagging, and hauling to Jonesboro.  In return, I sell my old, unwanted stuff, get 75% of the sale, and get an early shopping pass so that I can turn around and spend that money outfitting my crew for the upcoming season. 

I inventory my kids clothing needs before I go shop, so that I will stick with the plan and get just what's on the list (mostly).  Then, if the sale doesn't provide me with everything they need (usually, I still need shoes and pants for my hard to fit oldest), I can fill in the holes later.  Last season, I made enough money on the sale to cover everything I bought at the sale and a giant Old Navy order that filled in the rest of the wardrobe gaps.  Voila, 3 kids outfitted for the upcoming season, and it was all accomplished in the course of one (albeit intense) shopping trip and an online order. 

I know that some of these sales either don't have enough inventory to  justify the trip or are loaded with items that are stained or terribly dated.  I think that Popsicles is great because it is HUGE, well-run, and having a consignor pass allows me to shop early before it's all picked over. 

Just for further explanation, because I don't want you to miss how great this is. . . Take a look at this cute little tank top. 


Sure.  I could've bought it at Old Navy for probably $10, but instead, I bought it at the Popsicles Sale a few years back for $6.  Girl 1 wore it through 2 summers then handed it down to Girl 2 (it happens sometimes) who wore it a year.  Now, 3 years later, it's going back into the sale to be sold for $6 (again).  I'll make 75% of that sale ($4.50), which means that I'm out $1.50 for 3 years of use.  Are you seeing the beauty of this?

I'd love to hear from other thrify moms.  What do you do to save on cute wardrobe items for your kiddos?

Waste Not, Want Not

Today, as I was taking a shower and using my little mesh drawstring bag I made to hold the little pieces of soap that would otherwise be rendered useless, I was reminded of something I read lately.  An author was saying that she knew times were tough for her family when her mom sewed pantyhose bags to be able to make use of every last soap shard.  When I read it, I remembered thinking, "But what else would you do with the tiny pieces of soap?  Throw them away?"  I assume that's what most of us do. 

Later in the day, I found myself mending a hole Girl 2 tore in a dress that she wore to school last week.  (Whether or not the hole was ripped intentionally because of how upset she was that she had to wear a dress to school remains unknown.  I prefer to think that my sweet child is not capable of such malicious behavior, so we'll go with that.)  Once I'd fixed the hole in the dress, I searched my button jar for a button to replace the one on John's dress slacks that was broken by the cleaners this week and sewed it on.  This season, I've ironed on countless knee patches (Oddly, Little Boy is the only kid who's not yet donning patched jeans -- I thought boys were supposed to be the roughest on their clothes!?).

Mending clothing and using up every last bit of soap are nothing special.  But, in this consumer culture, many of us are guilty of putting those worn out jeans into the donate pile, or worse, the trashcan.  I want to fight back against that tendency and Waste Not.

I think my obsession with mending and reusing stems from our compost pile out back.  I've been amazed at what is compostable that I would normally throw away.  Things like shredded newspaper, coffee grounds, tea bags, and dryer lint are a few of the things I've been surprised to learn can be thrown onto the pile.  Who would've thought that I could re-purpose dryer lint, turning it into rich compost, that will turn into beautiful, nutritious garden-grown food for our family?

So, now I keep looking at things I might normally throw away and thinking "What else could I do with this?"  An empty spray bottle became the holder for my homemade hair conditioner.  Newspaper has become pots for starting seeds indoors.  The mesh bags that were the packaging for the bicycle knee pads and elbow pads the girls got for Christmas have been transformed into soap bags, like the one hanging in my shower.  Worn out washcloths have been sewn into reusable cotton pads I use for applying toner in my skin care regimen, and others were cut to size to fit my Swiffer mop perfectly.  Empty cardboard boxes have been broken down and will be used sometime next week as weed block underneath our new raised garden boxes.  The yogurt that was a couple days past date but still smelled just fine made a great treat for the chickens.  And the yogurt container -- who knows?   The possibilities are endless!

Between re-purposing, composting, and hauling things to the recycling center, our family of five can consistently fit a week's worth of trash headed for the dump into one 13 gallon kitchen-sized trash bag -- quite an accomplishment, if I do say so myself.

Perhaps this post can inspire you, too, to stop the next time you're about to toss a holey pair of pants, empty peanut butter jar, or yesterday's newspaper and ask yourself what else you could possibly do with it so as to Waste Not and Want Not.

Our Compost Bin

So, this is the compost bin I built using 3 (free) wooden pallets.  It's not beautiful, but it sits behind the shed, so we can't see it from the house. It's close enough to the house and the garden plot to be convenient.  I cleared and broke up the ground inside the bin to prepare the spot. Then set up and screwed together the three pallets.  I did not close the bin in so that it will be easier to access and turn over.  However, if you have animals in your backyard, or do not have a completely fenced in yard, you could attach a 4th pallet (perhaps with a hinge?) so that it could be swung open for turning over the pile.

Now, I'm ready to load it up with goodies.  From left to right:  First, I have shredded newspaper straight from our shredder.  This helps to balance the pH levels of the compost.  Next, is my kitchen countertop scrap collecting cannister.  I have it by my cutting board and use it to catch anything that needs to go out to the pile.  (Be sure that this is an airtight container; otherwise, you will have a haven for those little fruit fly/gnat things on your kitchen counter.) Things that CAN be included are any uncooked fruit or vegetable scrap.  Things that cannot be inculded are basically everything else.  This is not just a dinner scrap pile!  Meats or oils will attract animals and will cause the pile to stink.  Lastly, I've included some lawn trash.  Lawn trash can be grass clippings or raked leaves.  It really shouldn't be weeds unless the pile is already established and hot.  Lastly, the pile needs to be damp in order to activate properly.  Just mix all that up and use a shovel to turn it in with some of the dirt below the pile. In a matter of days, it will get hot and the produce scraps will begin to decompose.  Within weeks, I'll have great compost to add to next year's garden!


Now that my pile is established, all I have to do is use my pitchfork every few days to turn everything over and be sure that it stays a bit damp.  Nature does the rest.

We've been recycling for awhile (even though I have to haul it to the plant myself), but I was amazed at how adding composting to our routine has cut down on our trash.  This pic is of one week's worth of stuff I am hauling to the recycling plant.  (I realize that it may not seem very "green" to carry recycling in plastic bags, but after finding the dumpsters at the plant full a time or two and not having a way to dump my loose recycling, I decided that this is the way to go.)

Brace yourself.  This is not a manufactured photo.  I am quite proud of this photo of a kitchen-sized bag of trash.  This is all the trash that our family of 5 will be sending to the landfill this week.  Hurray for us!  Between recycling and composting, we've been able to cut it to this!  You don't have to be an extreme environmental activist to recognize that the less we pile into our landfills the better, and recycling and composting are something that nearly everyone with a little bit of space can do!