Brooding On

Guest Post: Our Cheap, Blueprint-less Chicken Coop


Hi, I'm Jess (an old college buddy of Ashley & John's) and I blog at Making Home

In June, we got ten Buff Orpingtons (yes, ten-- I have six children who insist on eating three times a day, plus snacks, and so we go through eggs at an alarming rate).  At first, I thought we would build our own chicken coop.  Then once I realized the sheer madness of what I had planned, I texted my husband Doug and told him I was a crazy woman and told him we should sell the chickens.  He texted back that he knew I could do it, and the rest is history.

Like I said, we have six children, and I stay home.  So buying the $1000+ deluxe coops with trendy colors and Ikea-like assembly instructions was an option far beyond our means.

Thankfully, a friend was in process of completely redoing his pool deck.  He let us pick through his used cast-offs.  That and a Facebook shout-out for plywood gave us all the wood we've used.  So the project of the blueprint-less chicken coop began.

The tools we had available were:
  • Table saw (borrowed from a friend)
  • Miter saw (borrowed from Doug's uncle)
  • Hammer & nails
  • Drill for installing hinges & attaching the coop ramp

I took notes and drew out probably 10 different potential plans that I liked.  Here were the main things I took into consideration as we drew up our plans:
  • Direction of the sun-- this is particularly important here in TX, but I think it would be a factor anywhere.  I wanted the chickens to have plenty of shade throughout the day.
  • Security-- Obviously I want the chickens to be well-protected.
  • Ease of design/building-- Aside from painting stretcher-bars in college, Doug & I had never built anything before.  Literally, nothing.  So keeping things fairly easy, construction-wise was a priority.
  • Good ventilation-- my plan included two windows + vented eaves
  • A Place to roost, a place to lay eggs, a place to eat-- meeting basic needs of the chickens.
Here's what we did:

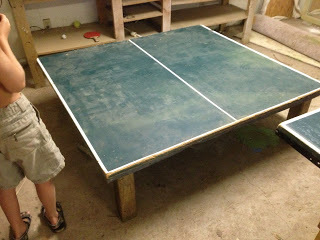
We used our old ping pong table as the floor/foundation for our coop, attaching 4x4s as the supports underneath.  We actually had two ping pong tables, and one of them was moving toward ruin, so we opted to salvage the usable parts and make the coop floor.  This picture doesn't show it, but we actually used 3/4 of the table, if you can imagine that... we cut the second half along the center white line and connected it to the side of this half:


Next, we framed the four walls.  I measured the edges of the table/foundation, remembering to subtract the width of any connected walls:


After we put the framing up on the floor, I cut plywood to fit each wall, leaving the windows and doors open, so that chickens wouldn't roost in (and poop in) the framing/walls.

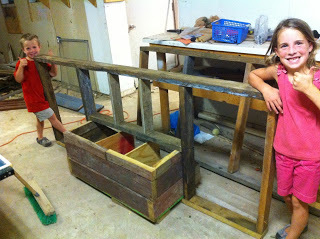
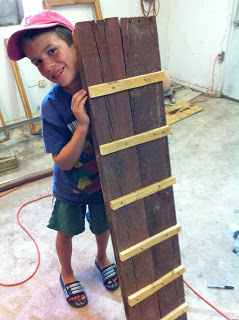
For unusual DIY features like the egg box and coop ramp, I researched before building. I looked at a lot of pictures of other people's coops, took notes of what I liked, general dimensions (our egg boxes are something like 11x11 or 12x12-- just big enough to lay in, but small enough to feel cozy), etc., and then looked at the wood we had available, and built it with those things in mind.


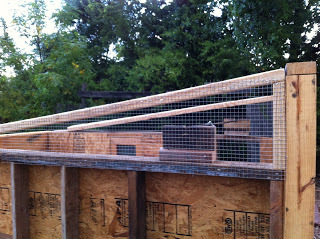
Instead of chicken wire, we used 1/2 inch hardware cloth.  It is more expensive, but with hawks and raccoons and even bobcats having stolen friends' chickens within a few miles of us, we decided that for our coop and adjacent chicken run, we would spend the extra money to actually protect them.  

For rain to stay off our chickens, I made a simple slanted roof.  To make the riser from the higher side (48 inches) to the lower side (36 inches) of the coop, I used a 2x4 to support a coop-length 2x4.  Because I'd read about the way that ammonia can gather in a coop and how important it is to have good ventilation, I opted to leave the eaves open, rather than siding them, and staple-gunned hardware cloth over it.  

(I figure, as time goes along, if I notice that this makes for a wet/snowy interior in certain months, I can always use plastic tarping to cover one or both sides, but it would be much more difficult to retro-install adequate ventilation.)


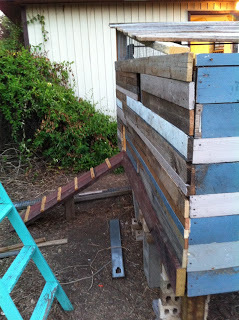
After getting the bones in place, I began using reclaimed 1x4 pieces to make siding for our coop.  I chose to use the thinner 1x4 pieces so that the exterior would be uniform and less heavy.  We also had 2x4 and 2x6 pieces in our wood pile, but the 1x4s (and occasional 1x2) turned out to be just right for siding.  I also used 1x4s for the roof base, since I'd run out of plywood.

The miter saw was invaluable at this point, so I could make sure the edges lined up nicely:


Here's what the inside of the coop looks like, from the Northern door opening:


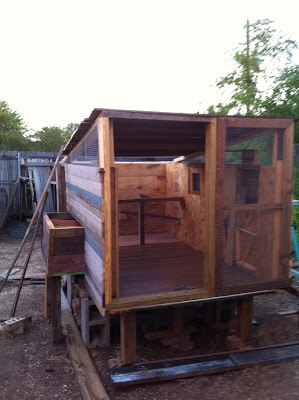
You can see that we have a 2' x 4' window that makes up almost half of the northern wall.  I opted to do that for airflow and so that they would get plenty of light in the coop, without it ever being direct light.

Also visible in the above picture are the roosts (there's a total of 10+ feet of roost space available for the girls), eggbox, and the 1' x 1' door that will lead to the coop ramp into the chicken run out the western side.

You can also barely see (but it may be more visible in the larger picture if you pull it up) the rebar (at ceiling level) I will use to hang my watering buckets from.  We opted to make our own watering buckets with poultry nipples so that the girls can't kick up grass, feed, and chicken poo into their water.

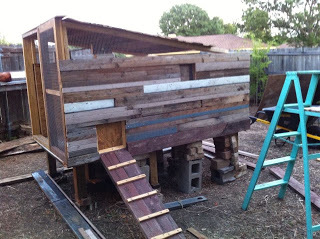
Here's the nearly-finished version of our blueprint-less chicken coop.  You can also see the 1x1 window I put above the chicken roosts to pull airflow closer to the birds without actually being across them (they do well with ventilation but not breezes).

We installed doors this last week, but I don't have pictures of that.  We just cut plywood to the appropriate sizes, used 1x1s to act as door stops (so the doors will open outward but not be able to be pushed into the coop) and installed them with basic T-hinges we found at Home Depot.

In all of this, I guess it's obvious, but I just let logic and the materials we had on hand guide my plans.  I did measure as we went along, but only for the coop to match up with itself, not to meet any particular plan.  It makes it slightly more necessary to do math and cut wood for the space, rather than according to a nice & neat blueprint, but it also allows you to use up what you have and not buy expensive wood.  

This made it so that we could use the materials we had, and meet the goals we had, for as cheap as possible.  When we looked at what we would have spent just on materials, had we not used reclaimed wood from a friend, we would have easily spent $800 or more just for wood & plywood.

In total, we spent $20 on wood (one friend had extra-good plywood & 2x4s available that they'd purchased to build a bunk bed but never gotten around to building; all the rest of our wood was free), used partially-rusty-but-straight nails we salvaged from our workshop and about $50 on hinges and such , and then we've spent about $100 on enough hardware cloth to do not only what was pictured above but also to do an attached 15' x 8' x 3'tall chicken run so that they will always have one safe, enclosed space to roam, in addition to occasional free ranging through our fenced yard.  

By reclaiming wood from friends and using what we had on hand, the entire DIY coop for 10 chickens (and attached run) will, in the end, cost less than $200, but I think it is comparable in space and quality to coops I've seen selling for anywhere from $1500+.  We like the reclaimed, older look of it, as if it's been around for a long time, and I think the chickens will love the safety, easy living, and ventilation of it.  

The blueprint-less chicken coop suits our needs and our budget, which was the initial goal.  

I hope this walk-through proves useful for other adventurous souls out there who are ready to do their own DIY chicken coop. 

DIY Lead-Free Lipstick

Guess what?  I've got yet another guest post for you today.  Man!  I feel like I'm on vacation!

According to her mom, Bethany, today's guest blogger, "is currently a sixth-grader at Hallsville Jr. High School in Hallsville, Texas, and is anticipating her eleventh birthday in August.  She enjoys singing, acting, writing, and pretty much any activity that gives her the opportunity to demonstrate her creativity."

I saw on Facebook what this crafty little gal was up to with this DIY lipstick and just had to ask her to blog about it for me!  I know I can't wait to try out this project!  Enjoy!


It all started when I found out that most lipsticks contain lead. Since lead is poisonous to the body, why would I put it on my lips every day? A few days later, I found a video on YouTube for how to make lipstick out of Crayons. Being my curious self, I had to click it. This simple trick saves money, helps you mix and match to find your own style, and is completely safe.

First, you're going to need Castor Oil. You can find it at a local pharmacy. We found it at Walgreens. Then, you're going to need pure Shea Butter. We found it at our local Drug Emporium. Last but not least, crayons! Pick whatever color or combination of colors you want; there are hundreds to choose from!


Next, you need a double boiler, or improvise one like we did with a stainless bowl. Then, depending on how big your containers are, you'll need to put the unwrapped crayon, Castor Oil and Shea Butter in. Here, we are using half a crayon, half a teaspoon of Castor Oil, and half a teaspoon of Shea Butter. It doesn't matter what order you put them into the double boiler. Then, turn the stove to medium high and start stirring. It might take a while to warm up, but in only a short matter of time, you'll have a lipstick liquid. Make sure there are no lumps of crayon left.
Then, you're going to turn your heat off and immediately spoon the liquid into your container. We used a small container from the travel section at Target, but an old lipstick tube will work as well. Then, stick it into the refrigerator for about 10 minutes.

In this picture, we quadrupled the recipe to better fit these containers. After 10 minutes or so in the refrigerator, you just take it out and boom: you have your own lead free, low priced, quality lipstick.


These are some of the colors that we made. We prefer lighter colors, but the darker colors show up well and may suit your taste. Here, I am wearing the "Poppin Pink" and my mother is wearing "Mamacita Mango." It's optional to name your colors, but I think it's a ton of fun and enhances the experience. I hope you had fun making your lipstick.
You can find out here if your lipsticks contain lead.

Living with Perspective

One day, I was running a loop through town and found myself running past Eric and Bethany Richardson's house here in town.  At first glance, it may resemble other houses on the block, but the lives they live, bouncing between their home here and their work in Haiti are anything but ordinary.  I follow their work on the mission field through their website and pray for the work they are doing there.   I remember from my own experiences with missions how my short time spent in another culture changed the way I approached life back at home and wondered how Eric and Bethany navigate the divide between time spent on the third world mission field and time spent here in small town Arkansas. 

So, once I got home from my run, I decided to just ask her.  :)  Her response is absolutely touching.  Enjoy! 

When Eric and I wait to board our plane back in the United States, the butterflies won't go away. The thought of going back to our family, friends and home always makes me giddy. Unfortunately, the butterflies disappear as we step into the air conditioned airport in Miami and the culture shock sets in. Consumerism, impatience, technology, processed food in a minute or less... it always seems too much too soon

I'm thankful that when we're in the States we call the tiny town of Cave City, Arkansas home. Where the hills are soft, the air is clean and people are friendly. But even still, the culture shock of the country can even be unnerving after a few months in Haiti.

A lot of people ask us, "What's it like to transition back?"

It's not what you would think. We don't get home and continue eating rice and beans for every meal, riding around in a beat up rental car, living out of a suitcase and sweating without A/C. Not at all in fact. We love to go to our favorite restaurants and cook our favorite meals together at the house. We love riding around in Eric's hand-restored 1966 Mustang. We love to go out on dates, hang out with our friends, go to the movies. There are days where we barely leave the house because its so nice to sit in the A/C!

In truth, within the tangible realm of living simply, we consistently keep only a few practices that might qualify, including buying local veggies, supporting local businesses, cooking the majority of our own meals, repurposing items, and taking care of our land.

That's why when I asked Eric how he feels Haiti has changed our lives and it had nothing to do with the things above, I knew where he was coming from. "It's like the idea of living simply can come in many forms. For us, I think it's in our attitude, priorities and most of all, perspective. Haiti has given us a new way of looking at the world--a new paradigm." He is so right.

When our food is late at a restaurant, we don't yell at the waiter or ask for a refund. I can assure you the longest we've ever waited in America isn't half the time we typically wait for food in Haiti. - Patience.

When there is a rain-storm that ruins our bathroom due to a leaky ceiling, we renovate with gladness. The simple fact that we own a roof over our heads is stark in contrast to the needs we see in Haiti. - Gratitude.
When I look in the pantry and am tempted to say, "we have nothing to eat!" I try to still my tongue and get creative. I've seen the face of starvation and it is not a partially full pantry or a pant size 14. - Truth.

When we have been waiting at the airport for hours only to find out our plane has been cancelled, we try to stay patient and positive to those around us. There is no point in going through life angry, it could always be worse. - Kindness.
Our 1,000 sq. ft.  house seems more like a luxury apartment than the quaint, "small" home we first purchased almost 4 years ago. When we get home, we always purge the house of items we don't really need. Too much clutter around you brings about a cluttered life, right? - Giving.

When the electricity goes out, we laugh. For the majority of the time in Haiti, we live without power. Instead of getting angry, we enjoy the silence that it brings. - Joy.

Haiti has changed us in the simplest of ways, but also maybe in the deepest. Haiti continually gives us a new lens to view the world with each day. When facing challenging moments with a new world-perspective, the right decision is often made very clear. Sometimes it just takes looking through a lens of patience, gratitude or truth. Of kindness, giving, or joy. Other times it requires a lens of simple reality.
 
Living "simply" can mean different things to different people. For some people, its growing a garden and canning food for the winter. For others, it is sewing your own clothing or buying local. But sometimes, as it is with us, living simply can come from a change in attitude. It can mean focusing on the good things and looking for joy in every situation. Or, it can mean striving to live patiently, lovingly and with a lens of compassion.

We aren't perfect people, and some days we fail miserably. Some days I honk my horn a little too long at the person on their cell phone. Some days I want to pull my hair out when my "vegetarian" meal has fish in it. Other days it just seems too much of a bother to mess with being polite. But, we know that every day is a choice. We can either double down and root deeper into what we know is right and true, or give up completely.
 
And so I choose the harder path, that ultimately leads to a healthier life.

I choose to live with perspective.
 
So with that, I ask you : What do you choose? What does living simply mean to you?
 

Bethany, thank you, thank you for your beautifully crafted response and for your willingness to share this piece with me and the readers of this blog.  I've long wanted to introduce the concept of guest posts, and I can't imagine a better place to start than here.  Your perspective is both touching and challenging. Thank you.
 
To follow and/or support Bethany and Eric in their ministry, check out their website at http://ericandbeth.us/.